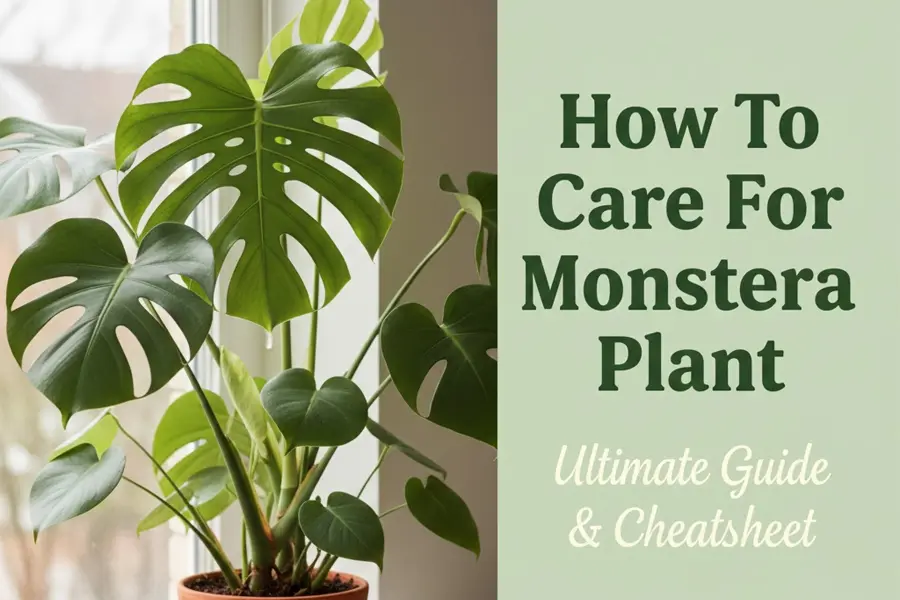
At Tropical Plant Kit, we’ve worked with Monsteras for many years—growing them, experimenting with substrate formulas, testing moss poles, and documenting how they behave in different indoor environments. Few houseplants trigger the same fascination as a well-grown Monstera: each new leaf unfurling with larger fenestrations, thicker stems, and a presence that anchors a room. Despite their dramatic appearance, Monsteras are surprisingly forgiving once you understand their natural growth habits.
Unlike small, compact houseplants bred to fit windowsills, Monsteras are hemi-epiphytic rainforest vines. In the wild, they climb trees, stretch toward diffused canopy light, and develop slotted leaves as they mature. This evolutionary context explains almost every care requirement—from why they love chunky soil to why they lean toward brighter windows to why aerial roots appear so enthusiastically.
This guide distills both scientific understanding and hands-on practice. Instead of generic instructions like “water when dry,” you’ll find concrete criteria—what dryness looks like, how to distinguish underwatering from compaction, how much NPK is actually appropriate, and the exact point variegated cultivars begin to burn under strong light. Our goal is to help you grow a Monstera that not only survives but actively thrives.
Table of Contents
What Is a Monstera?
Monstera is a genus of evergreen, climbing plants in the family Araceae, native to Central and South American rainforests. The name comes from the Latin monstrum, referring to their unusual perforated leaves. While the Monstera deliciosa is the most familiar species, the genus contains nearly 50 recognized species—many with distinct textures, fenestration patterns, and growth forms.
All Monsteras share several traits:
• They climb by producing aerial roots along the stem.
• They prefer filtered, bright light rather than harsh sun.
• They grow larger and more fenestrated as they mature and climb upward.
• They appreciate constant, moderate moisture but struggle in waterlogged soil.
Understanding these fundamentals makes caring for any Monstera species easier, whether you’re nurturing a beginner-friendly deliciosa or a rare pinnatipartita.
Related Reading:
Why Monstera Is Loved by Houseplant Enthusiasts
Monstera sits at the intersection of aesthetics and adaptability. Plant lovers appreciate it for several reasons:
| Architectural presence | Growth speed and resilience | Fenestrations (leaf slits and holes) | High tolerance for indoor environments |
| A mature Monstera deliciosa can transform a plain room into a botanical space. Its glossy leaves can reach 60–90 cm wide indoors, and its sculptural shape stabilizes interior compositions. | With correct light and watering, Monsteras grow vigorously. Many owners see 3–6 new leaves per growing season, making them rewarding even for beginners. | These aren’t random decorations. They serve ecological purposes—reducing storm wind resistance and allowing dappled light to pass through multiple leaf layers. Indoors, they create a stunning visual signature. | Monsteras tolerate: • lower humidity than rainforest aroids • occasional overwatering mistakes • uneven light—as long as it’s bright enough • compact substrates (though not ideal) Compared to fussier plants like Caladium, Maranta, or Anthurium warocqueanum, Monsteras are significantly easier. |
And Also – Rich cultivar diversity:
From variegated albos to the rugged, bullate leaves of Monstera peru, collectors enjoy the variety available in the hobby. Each variant has its own quirks—some are fast, some slow, some stable, some revert.
How many different types of monstera varieties?
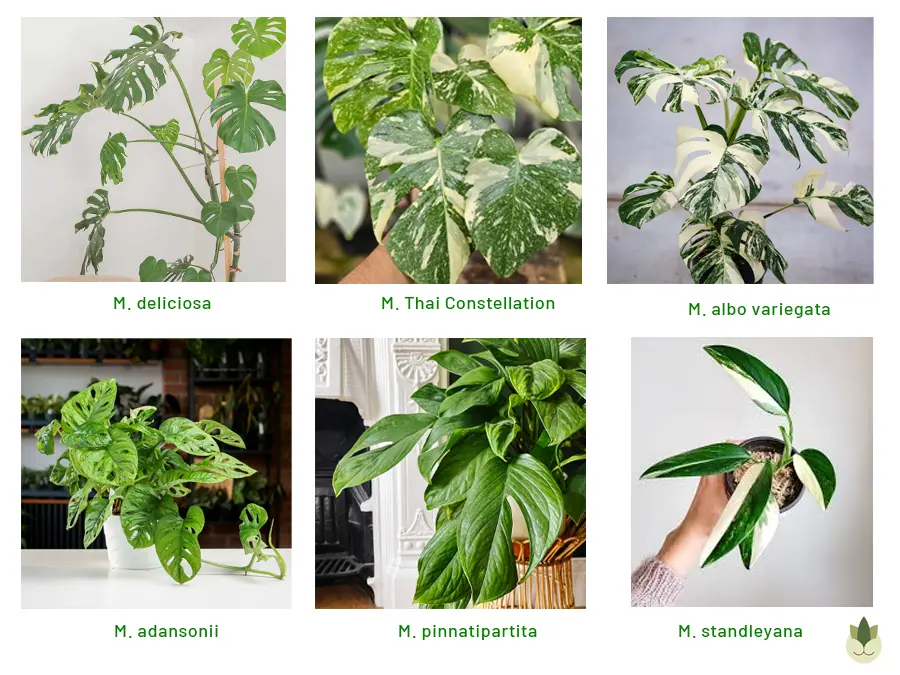
There are 59 recognized species of Monstera, but in the houseplant world, we typically group them into three main categories: the common “Big Two,” the collector species, and the rare variegated cultivars.
1. The “Big Two” (Most Common)
These are the varieties you will most likely find in a standard plant shop.
- Monstera deliciosa: The classic “Swiss Cheese Plant” with large, heart-shaped leaves that develop splits and holes (fenestrations) as they mature.
- Monstera adansonii: Often called the “Swiss Cheese Vine.” It has smaller leaves than the deliciosa and is completely perforated with holes. It grows as a trailing vine rather than a large bush.
2. The “Collector” Species (Rare & Distinct)
These are true species found in nature but are rarer in cultivation.
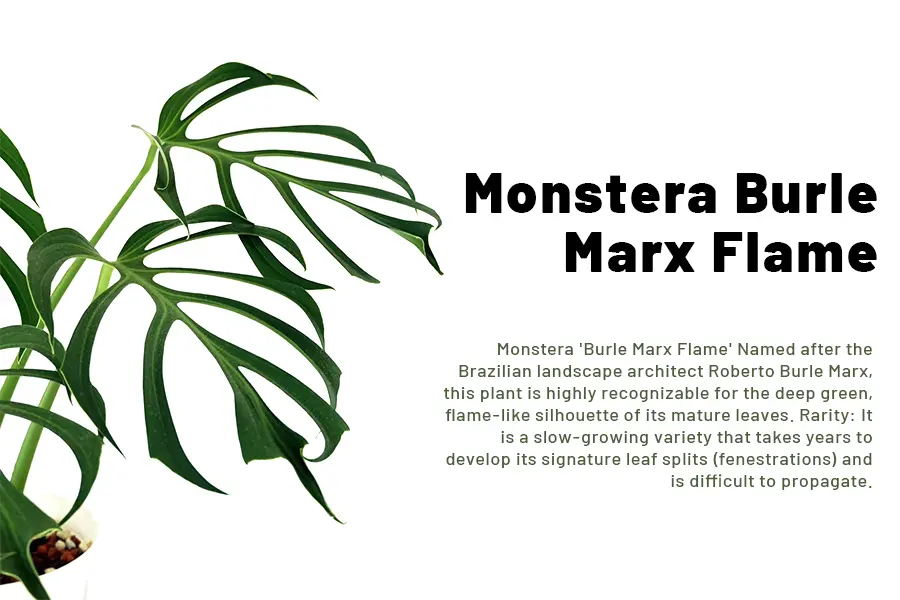
- Monstera ‘Burle Marx Flame’: (From your previous question) Unique for its narrow, flame-like leaves and thick texture.
- Monstera obliqua: The “Holy Grail” of Monsteras. It looks like adansonii but is 90% hole and 10% leaf. It is incredibly rare and fragile (often confused with adansonii).
- Monstera peru (M. karstenianum): Distinctive because it does not split. It has thick, rigid, puckered leaves that look like reptile skin.
- Monstera standleyana: Long, lance-shaped leaves that do not develop holes. Often found in a variegated “Albo” form (white stripes).
- Monstera dubia: A “shingling” plant. When young, the leaves lie perfectly flat against a board or tree trunk, looking like silver shingles.
- Monstera siltepecana: Starts with silver, lance-shaped leaves. As it matures and climbs, the leaves turn dark green and develop holes.
- Monstera esqueleto: Looks like a giant adansonii. The leaves are huge with massive holes, resembling a skeleton.
3. The “Designer” Cultivars (Man-made or Rare Mutations)
These are mutations of Monstera deliciosa or adansonii, prized for their color.
- Thai Constellation: Cream/yellow speckled variegation. Stable (won’t revert to green).
- Monstera Albo: Patches of pure white. Unstable (can revert to full green or go full white).
- Monstera Aurea: Yellow/Lime green variegation instead of white.
- Monstera Mint: A very rare mutation with subtle mint-green marbling.
Quick Summary Table: Monstera Types & Basic Difficulty Level
Below is an easy reference table from our internal cultivation notes.
Table: Monstera Species Overview & Difficulty
| Species | Leaf Characteristics | Growth Speed | Care Difficulty | Notes |
|---|---|---|---|---|
| M. deliciosa | Large, split leaves | Fast | Easy | Ideal beginner plant |
| M. adansonii | Many holes, smaller leaves | Fast | Easy–Medium | Needs climbing for larger leaves |
| M. peru (karstenianum) | Thick, bullate | Medium | Medium | Prone to rootbound issues |
| M. Thai Constellation | Cream variegation | Medium–Slow | Medium | Stable variegation; avoid strong sun |
| M. albo variegata | White variegation | Slow | Medium–Hard | Very light-sensitive, prone to burn |
| M. pinnatipartita | Deep splits as it matures | Medium | Medium | Loves strong support |
| M. dubia | Shingling juvenile form | Slow–Medium | Medium | Needs high humidity for shingling |
| M. standleyana | Small, lanceolate leaves | Fast | Easy | Often mislabeled |
Monstera Care Guide – Basics & Fast Overview
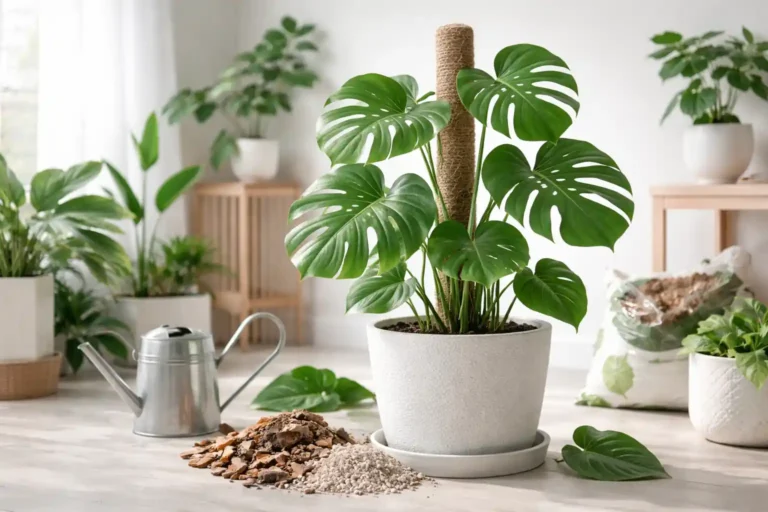
Monstera care isn’t difficult, but it is specific. The plant is flexible as long as a few core conditions are consistently met—bright but indirect light, deep but infrequent watering, and an airy substrate that prevents suffocation around the roots. Every additional technique (moss poles, humidity adjustments, fertilizer choice) simply fine-tunes your results.
Before diving into deep horticultural explanations, here is the “big picture” snapshot that guides our own indoor Monstera maintenance. Think of this section as your compass—later sections provide the granular instructions behind every bullet point.
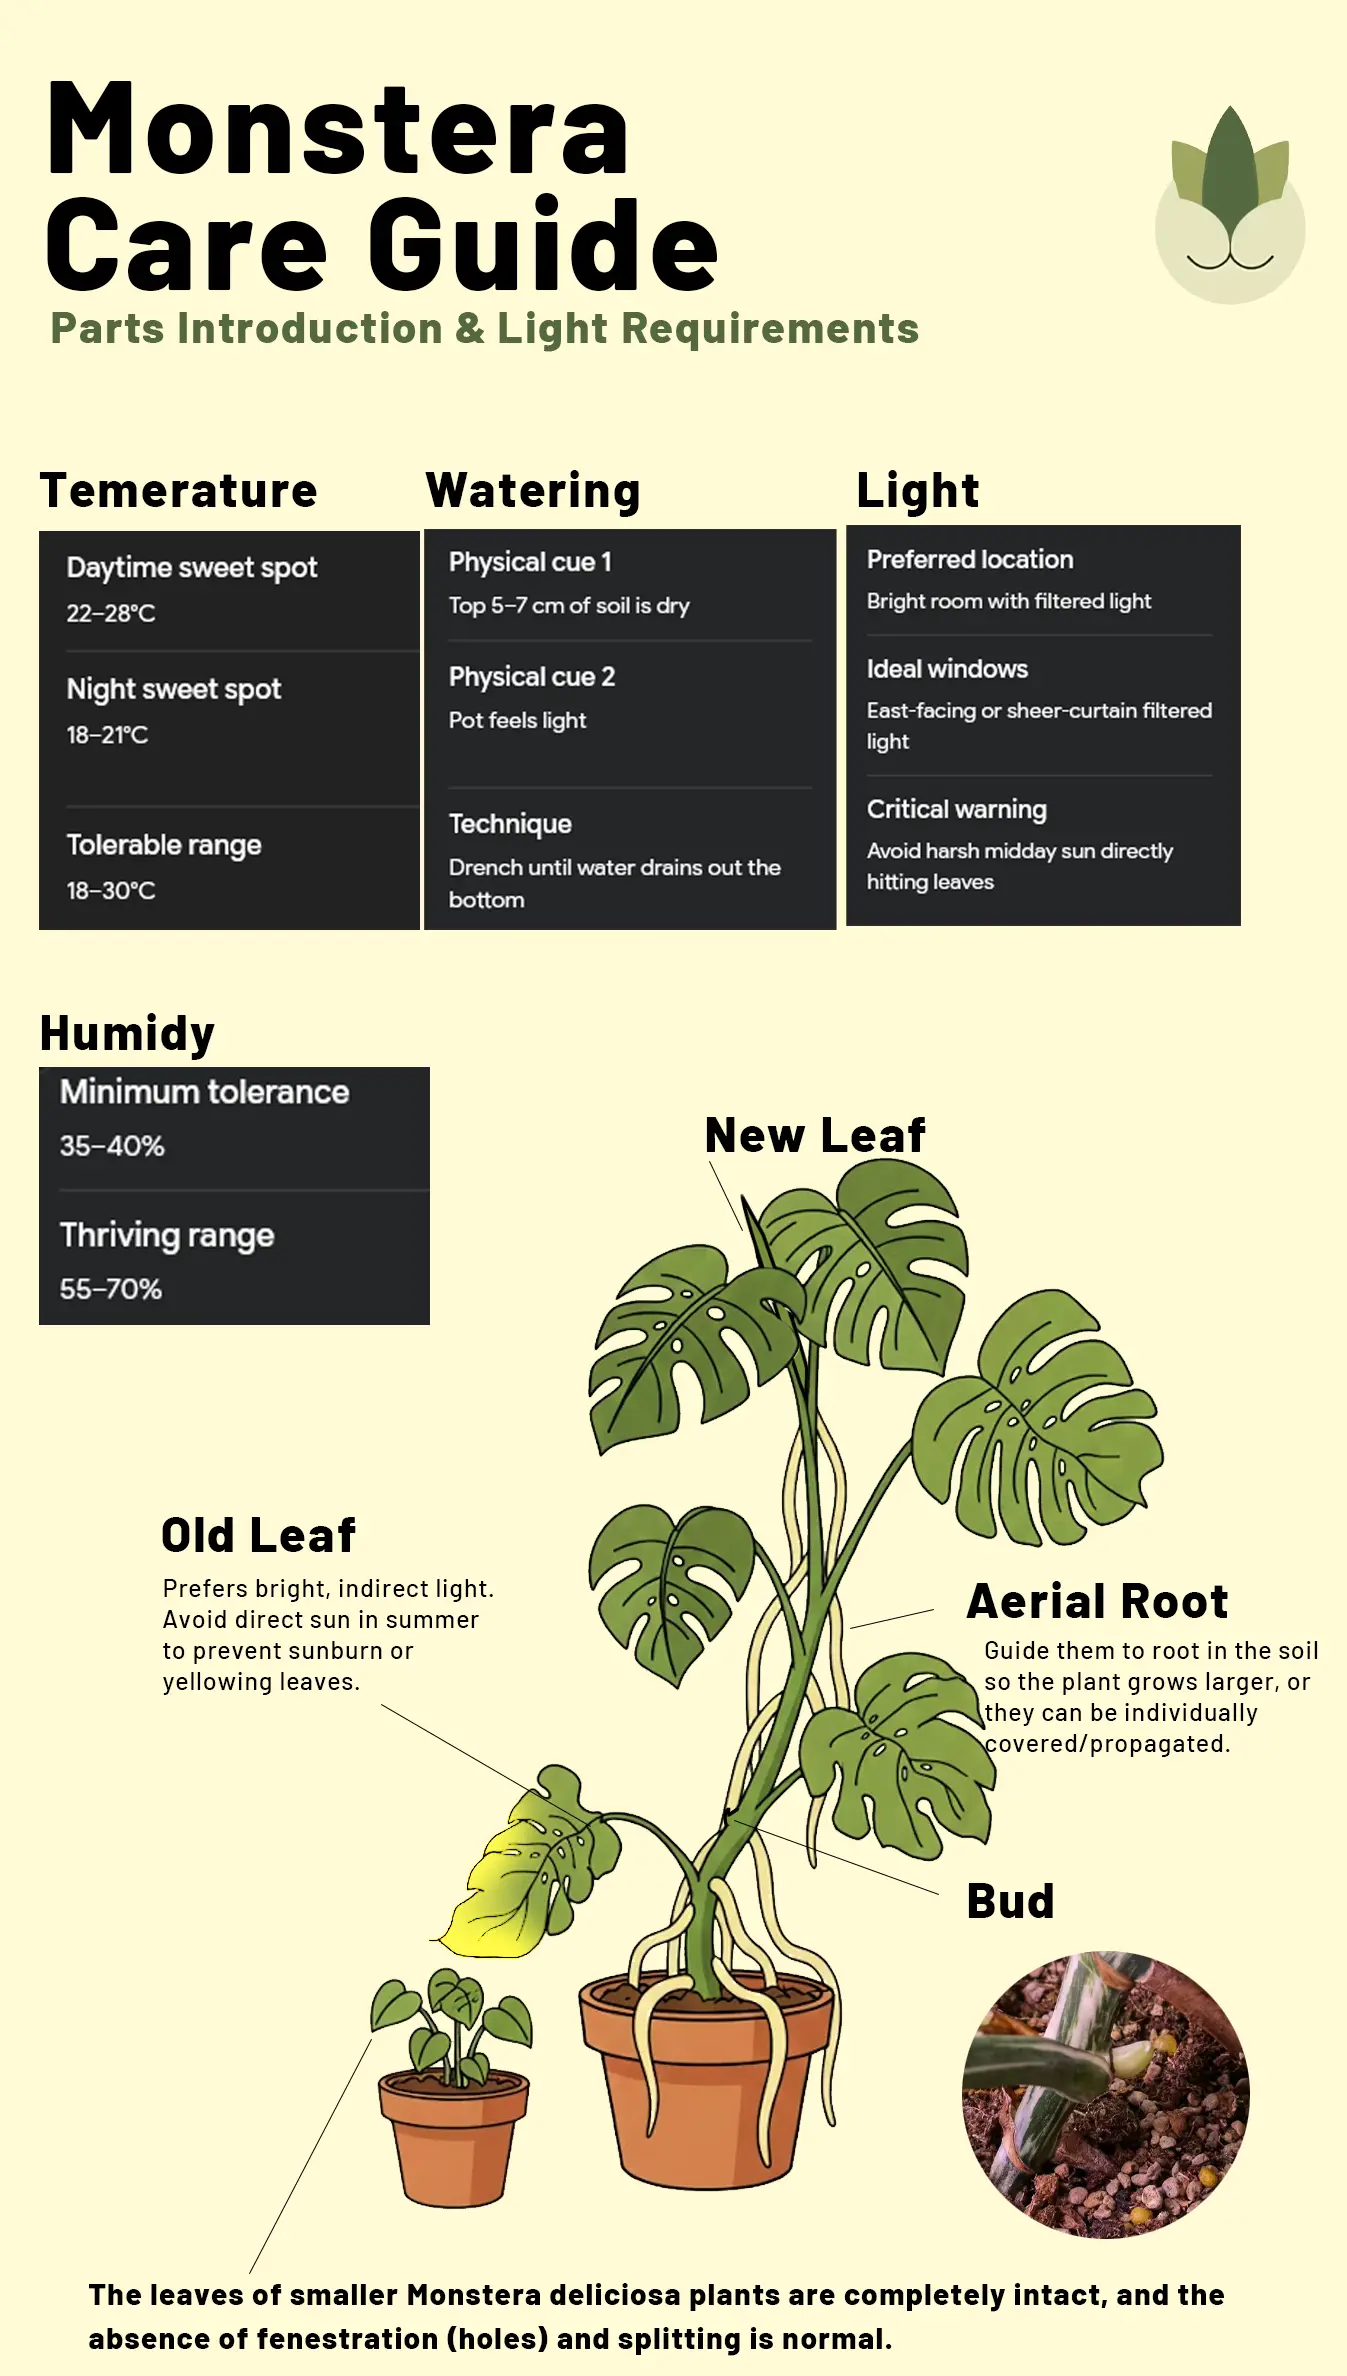
Light: Bright, Indirect
Monstera evolved under rainforest canopies, where sunlight is scattered. Indoors, this translates to:
- A bright room with gentle, filtered light
- East-facing windows or pulled-back sheer curtains
- No harsh midday sun directly hitting leaves
- Healthy light = larger leaves, stronger stems, earlier fenestrations.
Watering: Deep & Infrequent
Monstera prefers its soil to dry out partially between waterings, but not bone-dry. Instead of “water weekly,” use clear physical cues:
- Top 5–7 cm of soil is dry
- Pot feels light
- Roots aren’t pressed against the pot walls (compaction speeds drying)
When watering, drench the soil thoroughly until water drains out the bottom—this flushes salts and encourages deeper root development.
Temperature: 18–30°C
Monsteras appreciate warmth. The sweet spot indoors is:
• Daytime: 22–28°C
• Night: 18–21°C
Anything below 15°C slows growth significantly, and below 10°C can cause cellular damage.
Humidity: 50%+ Preferred
Most Monsteras tolerate 35–40% humidity, but thrive at 55–70%. Higher humidity improves:
- leaf size
- texture and sheen
- aerial root activity
- unfurling without cracking
Variegated cultivars benefit from slightly higher humidity (50–65%) to reduce leaf-edge crisping.
Soil: Chunky, Airy Mix
Monsteras dislike compact peat-heavy soils. Their roots require oxygen. An airy aroid mix prevents root rot and supports velamen root structure.
A correct Monstera mix contains:
- chunky bark
- coco coir
- perlite or pumice
- a small portion of compost
- optional charcoal for purity
We’ll detail exact recipes in Another blogs.
Fertilizer: Monthly During Growing Season
Monsteras are moderate feeders. In our tests at Tropical Plant Kit, a balanced NPK formula of 3-1-2 or 5-3-2 supports consistent growth without salt buildup.
Apply:
• monthly in spring/summer
• every 6–8 weeks in autumn
• none in winter dormancy
Slow-release pellets can complement liquid fertilizers.
Support: Moss Pole or Stake
Monstera is a natural climber. A support encourages:
- larger fenestrations
- vertical growth
- thicker stems
- stronger roots
A moist sphagnum or coir pole provides the best anchoring surface. This is especially true for long-stemmed varieties of Monstera deliciosa. We explain training techniques in the following content.
Monstera Care Cheat Sheet (Save it in Your Phone for next time quick reading!)
Light Requirements for Monstera
Leaf size, stem thickness, spacing between nodes, and even fenestrations all trace back to light quality. Monsteras evolved under rainforest canopies, where sunlight is filtered through layers of leaves. Indoors, the challenge is recreating that soft but abundant brightness—enough to fuel photosynthesis, but not so intense that foliage burns.
Light mistakes are the number one reason Monsteras grow small, plain, or leggy. This section breaks down the exact mechanics of bright, indirect light, how to diagnose issues, and what to do when your home has limited natural light.
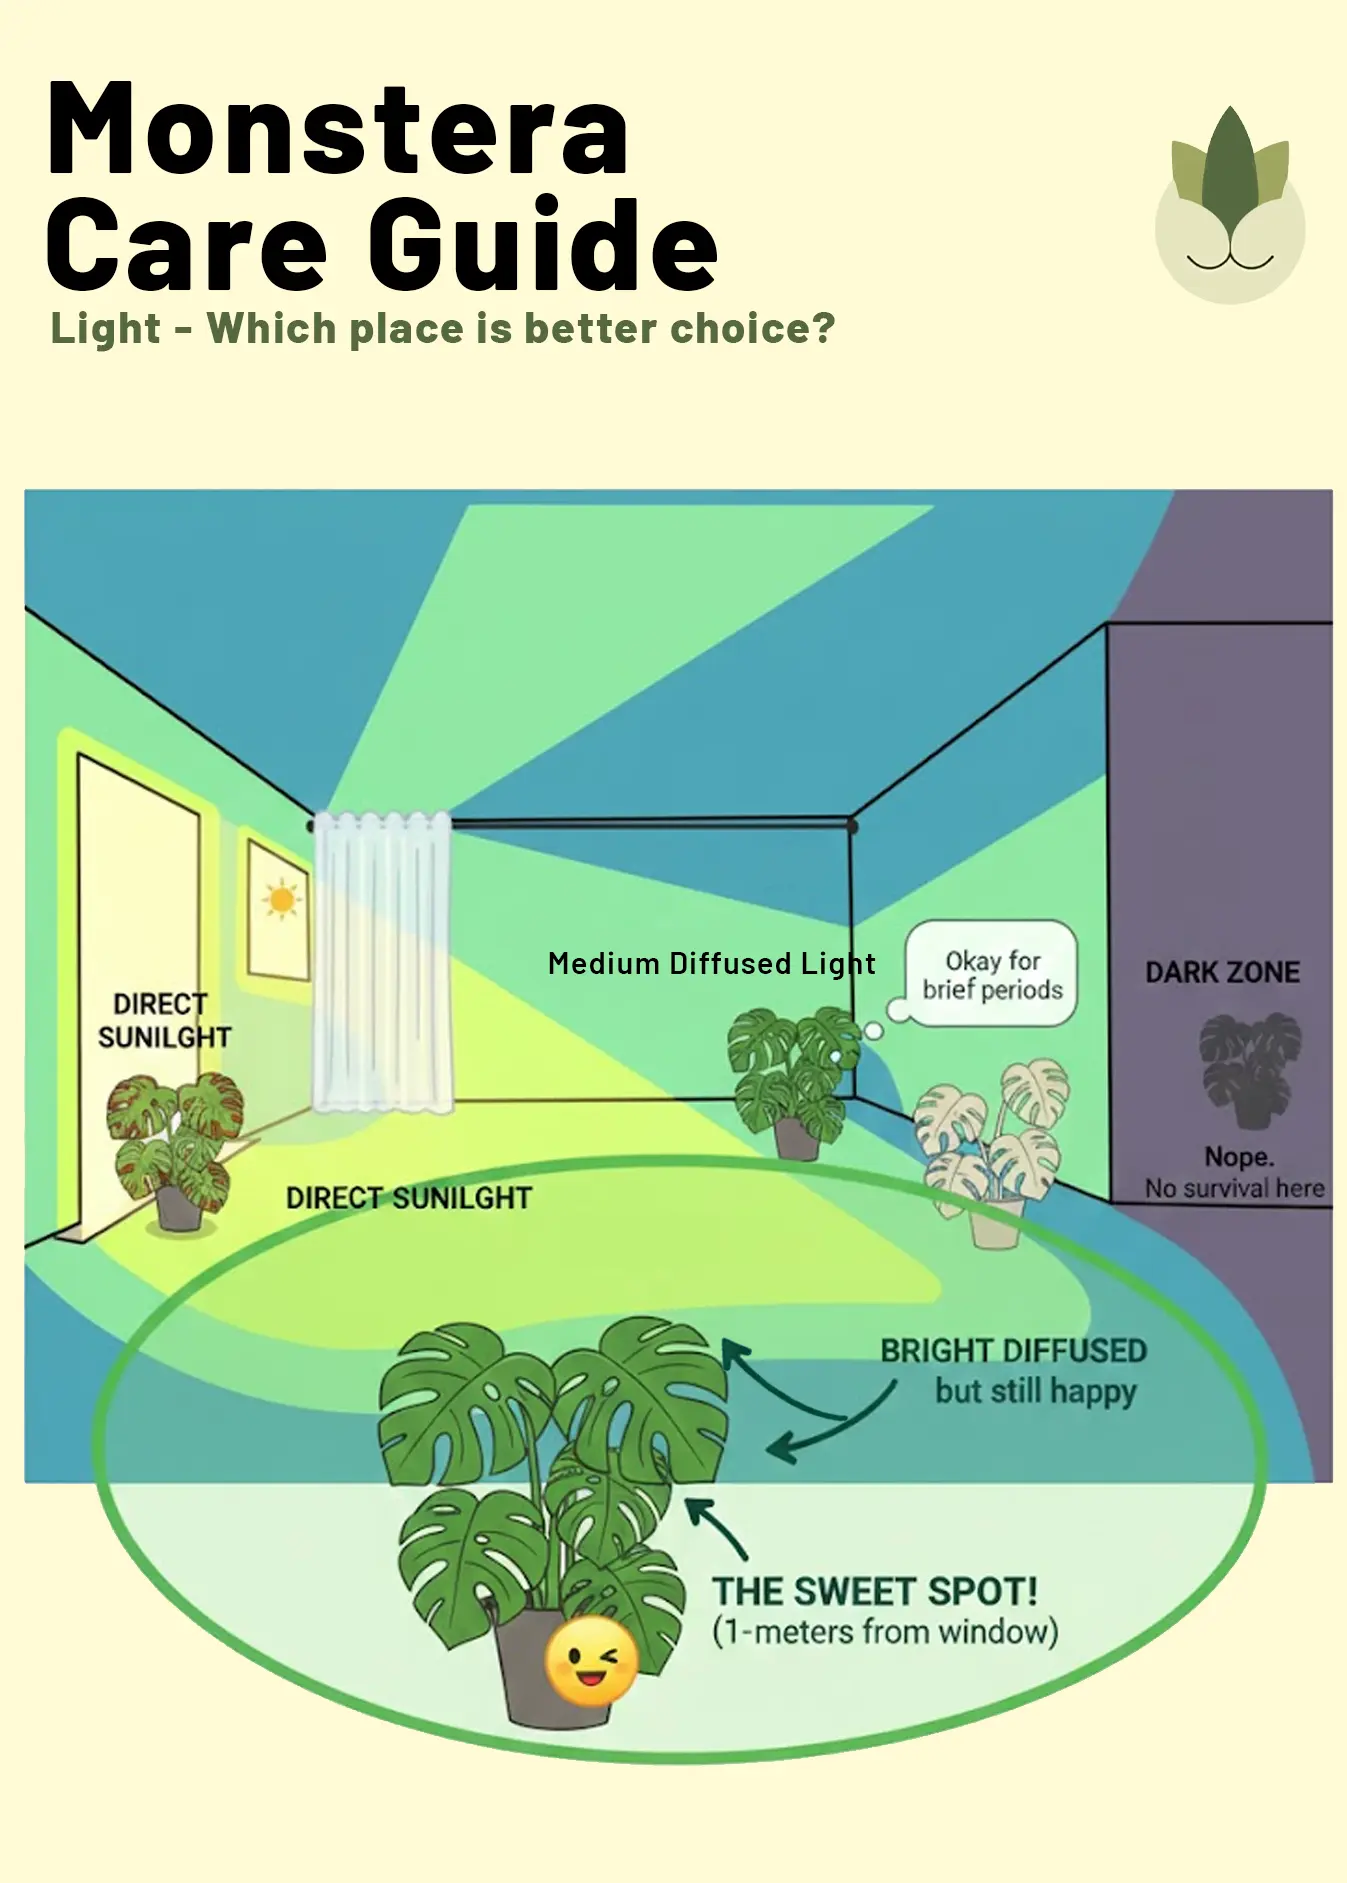
What “Bright, Indirect Light” Means for Monstera
The phrase appears everywhere, but few sources explain it clearly. For a deeper breakdown of window directions, lux levels, and room layouts, see our [full guide to Monstera light requirements].
In practical indoor terms, Monsteras thrive in:
- A room with strong ambient daylight
- Light that illuminates the entire plant without direct sun hitting leaf surfaces
- Approximately 10,000–20,000 lux (measured with a phone app or light meter)
- A location where you can comfortably read without turning on a lamp during the day
Monsteras can handle brief early-morning sun (east windows) or soft late-afternoon sun (west windows with sheer curtains). But midday direct sun—especially in summer—can scorch even the toughest deliciosa leaves.
Monsteras can handle brief early-morning sun (east windows) or soft late-afternoon sun (west windows with sheer curtains). But midday direct sun—especially in summer—can scorch even the toughest deliciosa leaves.
The 1-meter rule:
A Monstera placed 1–2 meters away from a bright window often performs better than one exposed to direct sun right on a windowsill.
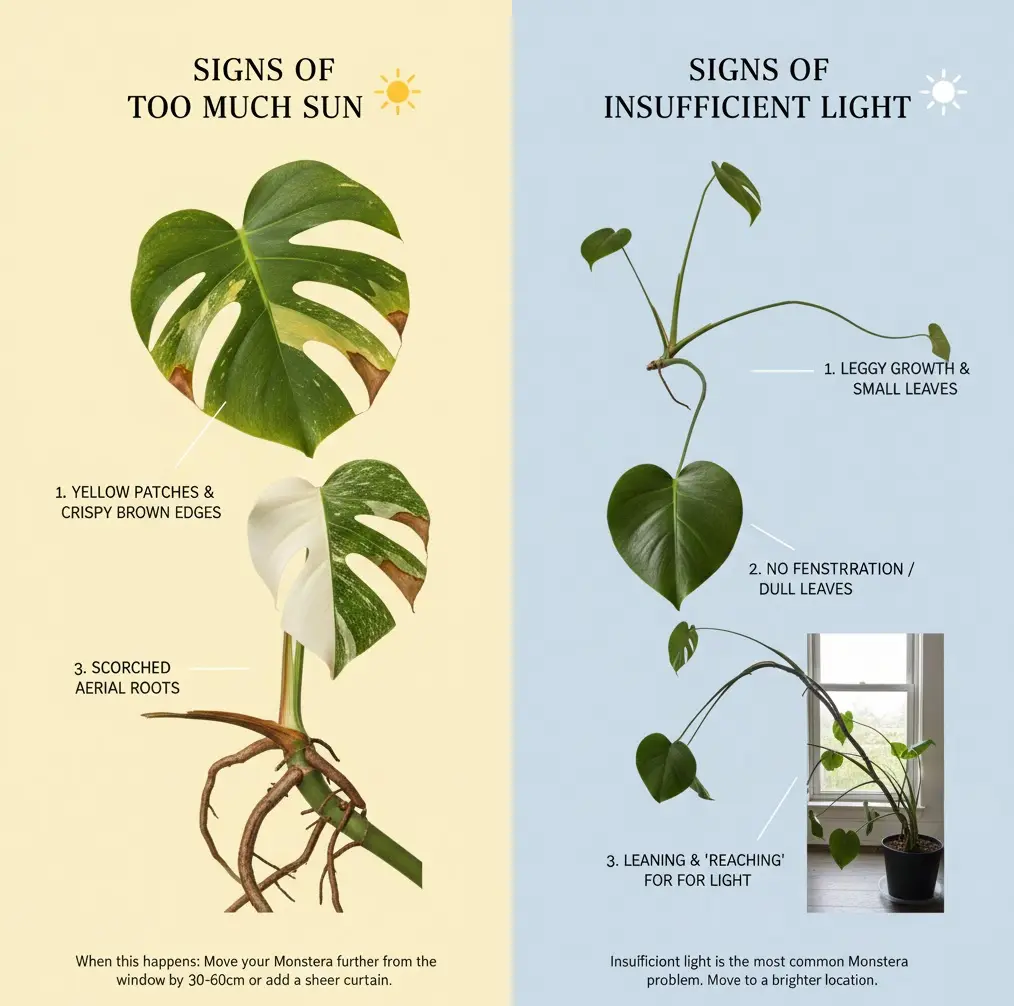
Signs of Too Much Sun
At Tropical Plant Kit, we evaluate leaf burn patterns during light testing. The following symptoms indicate excessive light intensity or direct sun:
1. Yellow patches
Sunburn often begins as uneven yellow-ish areas on the exposed side of the leaf.
2. Crispy brown edges
The edges dehydrate faster than the rest of the leaf. This usually happens before internal tissues burn.
3. Bleached or faded variegation
Variegated Monsteras (especially Albo) lose pigment under strong light.
White sections may turn beige or translucent.
4. Scorched aerial roots
Roots exposed to harsh sun dry and harden prematurely.
When this happens:
Move your Monstera back from the window by 30–60 cm or add a sheer curtain. If using grow lights, increase distance immediately.
Signs of Insufficient Light
Insufficient light is the most common Monstera problem we see. Symptoms include:
1. Leggy growth
Nodes stretch between leaves, creating a sparse, vine-like appearance.
2. No fenestration
Leaves remain small and entire (no splits or holes), even after several growth cycles.
3. Dark green leaves turning dull
The plant tries to increase chlorophyll production to compensate but eventually loses sheen.
4. New leaves smaller than old ones
A clear signal of energy deficiency.
5. Leaning or “reaching” toward the window
The stem bends dramatically toward the brightest side.
Can Monstera Survive in Low Light?
Survive—yes.
Thrive—rarely.
Monsteras are surprisingly tolerant and may stay alive in rooms with as little as 2,000–5,000 lux, but growth becomes:
• slow
• sparse
• unstable
• unfurrowed (no splits)
If your Monstera is more than 2–3 meters away from a window, it will likely need supplemental grow lights to maintain healthy development.
Variegated types cannot survive low light long-term.
White variegation lacks chlorophyll. Without bright light, variegated Monsteras revert, decline, or produce weak, floppy stems.
Best Indoor Window Directions (Ranked)
Based on our tests in multiple home environments:
1. East-facing window
Ideal. Gentle morning sun + bright ambient light for the rest of the day.
2. South-facing window (with sheer curtain)
Excellent once filtered. High brightness supports fenestrations and large growth.
3. West-facing window
Good but monitor for harsh afternoon sun.
4. North-facing window
Often too dim, especially in winter or cloudy climates. Requires supplementary lighting.
Distance Guide:
• 0.5–1 m away = ideal for most Monsteras
• 1–2 m away = still good for deliciosa
• 2–4 m away = grow light recommended
• Beyond 4 m = Monsteras will slowly decline
Grow Light Recommendations
Grow lights are essential in homes with limited natural light or during winter months. The goal is to mimic bright, indirect natural light without overheating leaves. For a step-by-step setup, see Monstera Grow Light Guide: Distance, Hours & Best LED Setup.
Recommended Wattage
• 20–40W LED panel for medium Monsteras
• 40–80W for large, mature plants
• Efficiency matters more than wattage—choose lights labeled full-spectrum 400–700 nm
Distance from Plant
• 30–45 cm above the top leaves for most LEDs
• For high-intensity LEDs: increase to 50–60 cm
• If leaves feel warm to the touch, the light is too close
Duration
• 8–12 hours per day during autumn and winter
• Follow a consistent schedule using a timer
• Reduce hours in peak summer if natural light is already strong
Avoid These Mistakes
• Placing lights too close—leads to bleached leaves
• Using cheap purple lights—inefficient and visually unpleasant
• Inconsistent schedules—disrupts plant rhythms
Watering Your Monstera Properly
If we had to choose one skill that distinguishes a thriving Monstera from a struggling one, it’s watering. Monsteras are tolerant, but watering errors—especially overwatering—cause an estimated 70% of the issues we troubleshoot at Tropical Plant Kit. Understanding how Monstera roots absorb moisture, and when the soil environment shifts from “healthy moist” to “anaerobic,” is the difference between steady growth and frustrating stagnation.
Monsteras naturally grow with roots that explore airy forest litter and climb tree trunks. Their roots are built for moisture paired with oxygen, not continuously wet, compact soil. This section breaks down exactly when to water, how to diagnose problems, and what tools truly help.
How Often Should You Water?
There is no universal schedule—not weekly, not biweekly—because watering depends on:
• light intensity
• temperature
• humidity
• pot size
• soil composition
• season
Instead, use diagnostic triggers, not time intervals.
Water your Monstera when:
- Top 5–7 cm of soil is dry Push your finger deep—don’t just touch the surface.
- The pot feels noticeably lighter This is one of the most accurate cues after some practice.
- Soil pulls away slightly from the pot edges Indicates moisture has evaporated through the medium.
- Leaves slightly droop (not wilt) Healthy pre-watering droop is subtle but reliable.
As a rough baseline under typical indoor conditions (bright indirect light, 22–26°C):
• Summer: every 5–7 days
• Spring/fall: every 7–10 days
• Winter: every 12–20 days
But again—experience and moisture cues beat calendar schedules every time.
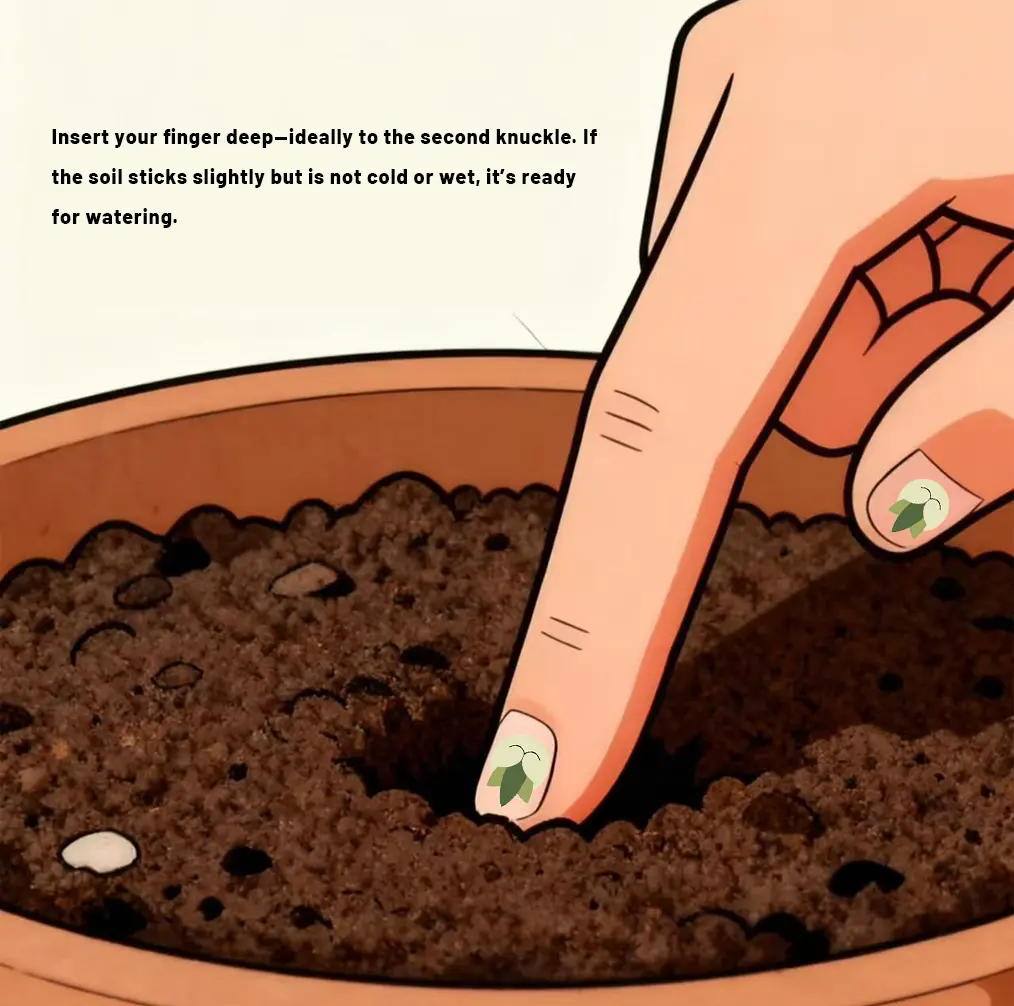
Finger Test vs. Moisture Meter
Finger Test (Highly Reliable)
We prefer this because it reads the actual condition of the soil.
Insert your finger deep—ideally to the second knuckle. If the soil sticks slightly but is not cold or wet, it’s ready for watering.
Moisture Meter (Useful With Limitations)
Moisture meters give quick readings but:
• often misread chunky aroid mixes
• register bark and perlite as “dry” even when deeper layers are wet
• corrode over time
Tip:
If you use a moisture meter, take readings from 3–4 spots in the pot and ignore “dry” readings above the top layer of bark.
Deep Watering Method (Our Recommended Technique)
The best way to water a Monstera is not lightly at the surface but deeply and thoroughly.
Step-by-step Deep Watering:
- Bring the plant to a sink, shower, or bathtub.
- Pour water slowly across the entire soil surface—do not dump in one spot.
- Continue until water drains freely from the bottom.
- Let the pot drain for 5–10 minutes.
- Return the pot to its cover pot/tray only when dripping stops.
Why deep watering works:
It flushes excess salts, hydrates the entire root ball evenly, and encourages roots to grow downward rather than circling near the surface.
Avoid:
• Bottom watering as your only method (leads to salt accumulation)
• Watering tiny amounts frequently (keeps roots too wet)
Sign Of Underwatering vs. Overwatering
| Feature | Underwatering (Too Little, Too Late) | Overwatering (Too Often, Too Soon) |
| Root Cause | Soil is dry when the plant needs water (common in hot climates or chunky mixes). | Watering when the soil is still wet (the most common problem worldwide). |
| Leaf Appearance (Overall) | Droopy, tired-looking leaves; petioles lack firmness. | Lower/Older leaves turn yellow first (plant prioritizes new growth). |
| Leaf Appearance (Specific) | Dry, brown tips (lack of full hydration). Crispy edges (common in warm, low-humidity environments). | Stunted or deformed new leaves (New growth is tiny). |
| Roots & Soil | Soil pulls away from pot walls (sign of severe dryness). | Roots: Mushy, dark roots (healthy roots are pale and firm). |
| Odor | No specific odor. | Soil smells sour or swampy (indicates anaerobic bacteria, a red flag for root rot). |
| Other Symptoms | Brown, soft leaf bases (often mistaken for disease, but due to moisture stress). | |
| Quick Diagnosis | Plant recovers quickly (stands up within hours) after watering. | Yellowing + mushy roots = early root rot. |
| Immediate Action | Water thoroughly. | Stop watering, increase airflow, and check the root ball if symptoms persist. |
Best Water Type: Tap vs. Filtered vs. Rainwater
Monsteras are not extremely sensitive compared to Calathea or Maranta, but water quality still affects long-term health.
Tap Water
• Usually fine
• Hard water may cause mineral buildup
• If chlorine levels are high, let it sit 24 hours before use
Filtered Water
• Best for variegated Monsteras
• Reduces leaf spotting and mineral crust in soil
Rainwater
• Excellent, naturally soft
• Use unless you live in an area with air pollution advisories
Distilled Water
• Not necessary; roots need trace minerals
• Use only for severe mineral sensitivity cases
Soil & Potting Mix for Monstera
If you’ve ever wondered why some Monsteras grow massive leaves even indoors while others stay small and sluggish, soil is usually the hidden factor. In our experience at Tropical Plant Kit, Monsteras respond more dramatically to substrate quality than to fertilizer or humidity. Their roots evolved to navigate loose rainforest litter, attach to tree bark, and move freely through oxygen-rich material—not dense, peat-heavy potting soil.
A Monstera kept in compact soil behaves like a completely different plant: fewer fenestrations, slower growth, more yellowing, and higher risk of root rot. But once you give it an airy, structured mix, everything changes: leaves unfurl faster, stems thicken, and aerial roots become more active.
This section explains the why, then gives you the exact mixes we use for our own Monsteras (including variegated cultivars).
Why Monstera Needs Airy Soil
Monstera roots are semi-epiphytic, meaning they grow both in the earth and above it. Their root structure consists of:
• Primary roots that explore chunky debris
• Aerial roots that grab onto surfaces
• Velamen tissue that absorbs moisture and oxygen at the same time
Because of this structure, Monsteras require a substrate that provides:
1. High Oxygen Availability
Oxygen is as important as water. When soil lacks airflow:
• roots suffocate
• anaerobic bacteria grow
• root rot accelerates even if you’re not “overwatering”
2. Fast Drainage
Monsteras want moisture—not stagnation. Water should pass through quickly and leave pockets of air behind.
3. Structural Components
Chunks and particles allow roots to weave through material and anchor themselves.
4. Moisture Retention Without Waterlogging
Coco coir and sphagnum hold moisture, while bark and perlite create pathways for drainage.
This balance is the secret behind every vigorous Monstera we’ve grown.
Best Monstera Potting Mix Recipe
Our standard Tropical Plant Kit aroid mix is specifically designed for Monstera deliciosa, adansonii, and most climbing species.
Below is the recipe we recommend for home growers.
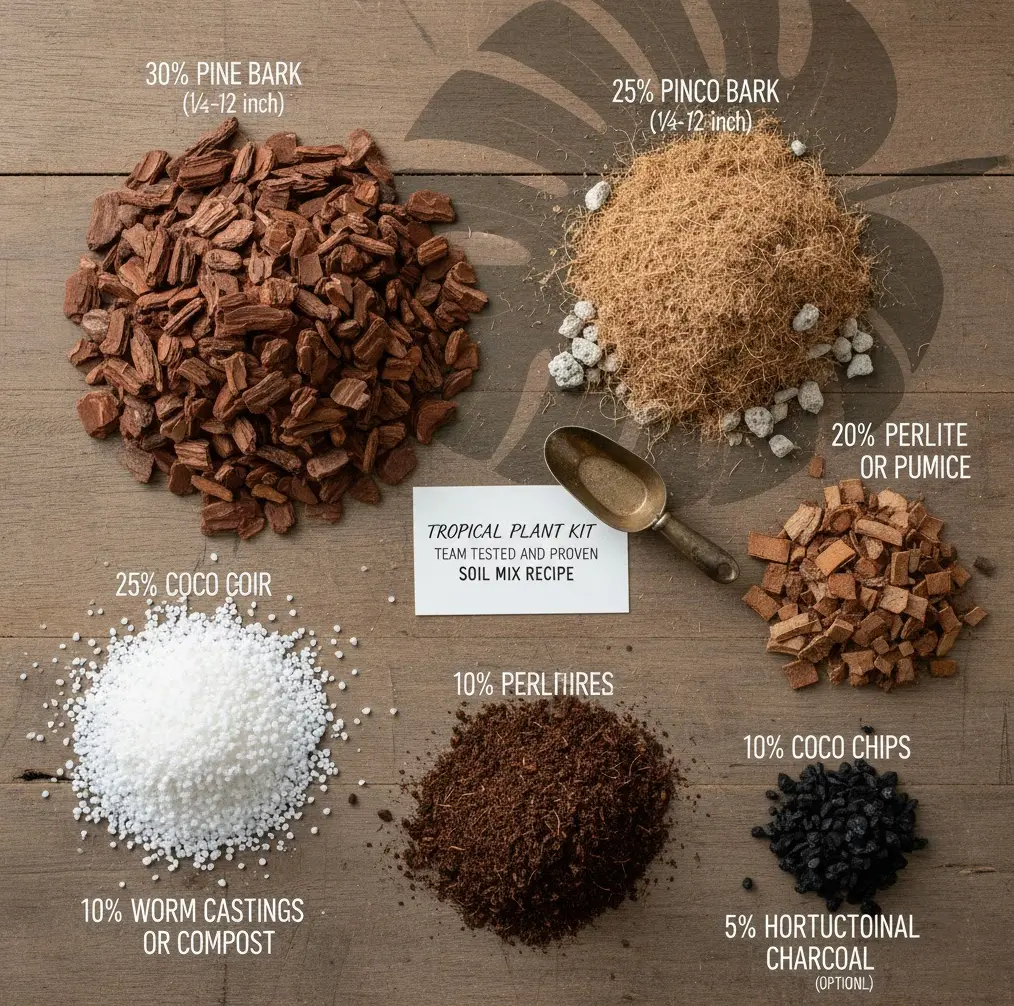
Tropical Plant Kit Team tested and proven soil mix Recipe For Monstera
- 30% Pine bark (¼–½ inch)
- 25% Coco coir
- 20% Perlite or pumice
- 10% Worm castings or compost
- 10% Coco chips
- 5% Horticultural charcoal (optional)
This mix delivers:
• excellent aeration
• stable moisture
• fast drainage
• nutrients without compaction
Alternative Mixes Based on Species or Environment
1. For Variegated Monsteras (Thai Constellation, Albo):
Variegated leaves rot more easily and prefer even more airflow.
• 40% bark
• 20% perlite
• 20% coco coir
• 10% pumice
• 10% worm castings
This creates a drier, faster substrate, reducing risk on slow-growing variegates.
2. For Humid Homes (60–80% humidity):
Soil dries more slowly.
• Increase perlite/pumice by +10%
• Decrease coir by –10%
3. For Dry Homes (Below 40% humidity):
Soil needs slightly more retention.
• Add +10% coco coir or +5% sphagnum moss
• Reduce perlite slightly
pH Requirements
Monsteras prefer a slightly acidic to neutral pH range:
pH 5.5–7.0
Why it matters:
• below 5.5 → nutrient lockout (especially calcium and magnesium)
• above 7.5 → leaves yellow due to iron deficiency
Most aroid mixes naturally fall around 6.0–6.5, which is ideal.
Drainage Importance
Drainage is not just about water escaping—it’s about preventing anaerobic pockets where roots decay. A potting mix with proper structure allows:
• gravitational water to drain quickly
• capillary water to remain for root access
• air to refill the gaps between particles
Signs of poor drainage in Monsteras:
• soil stays wet for 10+ days in warm weather
• bottom of pot smells sour
• plant shows overwatering symptoms despite careful watering
Critical reminder:
Good drainage does not mean “dry faster.”
It means “wet and oxygenated at the same time.”
Repotting a Monstera
Repotting is one of the most transformative steps in Monstera care. A healthy Monstera can double its growth rate after being moved into a fresh, well-structured substrate—especially if its previous soil has compacted, become hydrophobic, or accumulated fertilizer salts. At Tropical Plant Kit, we repot Monsteras not just because they’re “rootbound,” but because soil quality declines over time.
This section explains when, how, and where to repot, along with the subtle cues that many growers overlook.
When to Repot
Monsteras usually need repotting every 12–24 months, but the exact timing depends on their growth rate, soil structure, and pot size.
Here are reliable signs that your Monstera is asking for a new home:
1. Roots circling the bottom or emerging from drainage holes
A clear indication the plant has filled its pot.
2. Soil dries extremely fast (within 1–2 days)
Root density is too high for the pot volume.
3. Soil stays wet too long
Compaction reduces oxygen availability.
4. Visible salt crust on soil surface
Excess minerals from fertilizer accumulate over time.
5. Stunted growth or smaller new leaves
Often misunderstood as “low light,” but soil exhaustion is equally common.
6. A moss pole makes the plant top-heavy
Wider pots stabilize climbing Monsteras.
Best time of year:
Spring and early summer—when Monsteras are ready to push new growth and recover quickly.
Avoid repotting in:
• winter dormancy
• heatwaves
• immediately after receiving a plant via mail
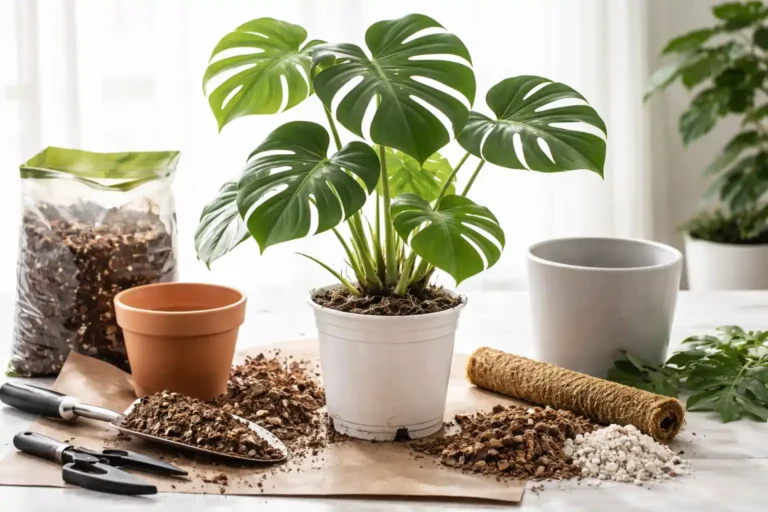
Step-by-Step Repotting Process (Tropical Plant Kit Method)
We use a careful repotting protocol that minimizes shock and encourages fast adaptation. Here is the exact method we follow in our studio.
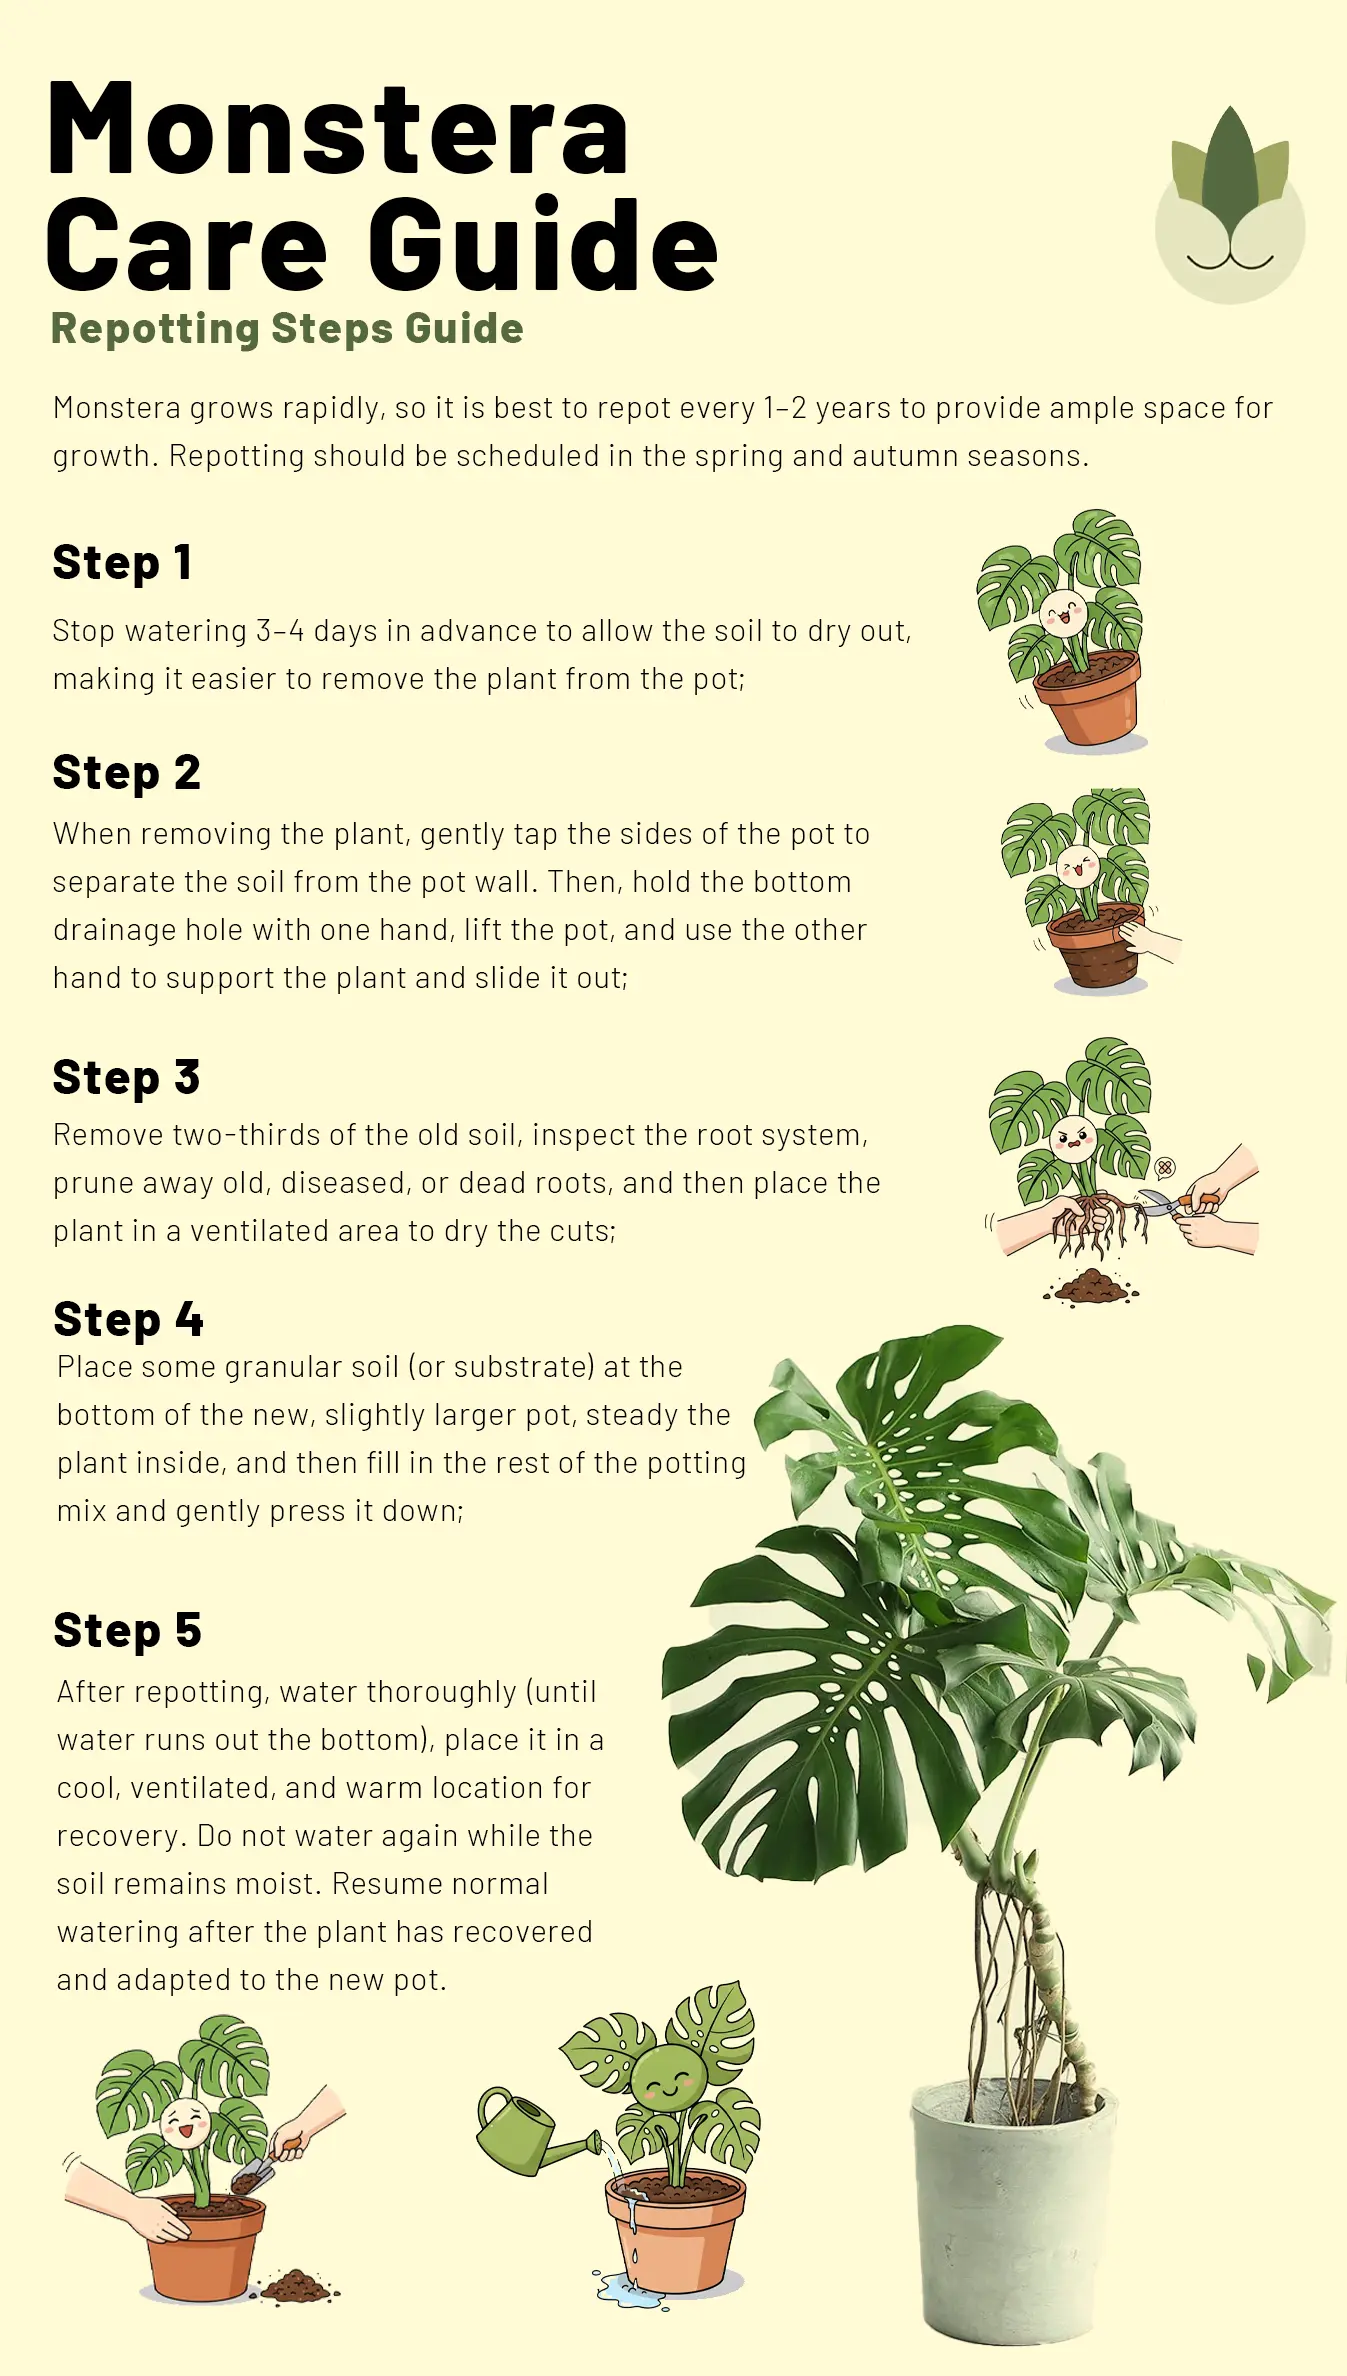
Step 1: Water the Monstera 24 hours before repotting
Slightly moist soil reduces root breakage and prevents hydrophobic pockets after repotting.
Step 2: Prepare your new soil mix
Use the aroid mixes described in Section 5.
Step 3: Gently remove the plant from the pot
Support the main stem and tilt the pot sideways. Avoid pulling the plant upward, which can snap roots.
Step 4: Loosen the root ball
• Remove 10–20% of the old soil
• Free tightly circling roots
• Cut brown, mushy, or rotten roots with sterilized scissors
Healthy roots are firm, pale, and lightly fragrant.
Step 5: Add a base layer of fresh substrate
This elevates the root ball and improves drainage.
Step 6: Center the plant & position the moss pole
If using a pole, install it now.
Never stab a pole into a newly repotted plant—this damages roots.
Step 7: Fill in the pot with fresh soil
Tap the pot gently so soil settles naturally.
Do not compress the mix—Monsteras need aeration.
Step 8: Water deeply
This activates the substrate structure and reveals if more soil is needed.
Step 9: Add top dressing (optional)
Bark chips, chunky perlite, or decorative stones help with moisture distribution and aesthetics.
Step 10: Provide gentle light and stable warmth
The first 2–3 weeks are the “adjustment period.” Keep conditions bright but not harsh.
Complete Low-Shock Repotting Guide Want the most beginner-friendly, cat-safe system with:
- 30-second check: Repot now, slip-pot, refresh—or wait?
- Quick decision table (what you see → what to do)
- Full low-shock 8-step method (including root inspection, no-gravel rule, support installation)
- When NOT to repot + 4-week aftercare checklist
- All common mistakes (overpotting, dense soil, etc.) and how to fix them
Read the Full Guide: When to Repot Monstera Deliciosa: 6 Signs, Best Season, and When to Wait
Pot Size Recommendations For Monstera
Choosing the right pot size is essential for preventing rot while supporting growth.
General rule:
Move up 2–5 cm (1–2 inches) in diameter per repotting.
Small to Medium Monsteras (Adansonii, Juvenile Deliciosa):
• Start: 10–15 cm pot
• Upgrade: 15–20 cm
Mature Monstera Deliciosa:
• Standard indoor size: 25–30 cm pot
• Large specimens: 35–45 cm pot
Variegated Monsteras:
Use slightly smaller pots than you would with green Monsteras.
Why? Variegated roots grow slower → smaller pot reduces water retention.
Avoid oversized pots
Oversized containers hold excess moisture → high risk of rot.
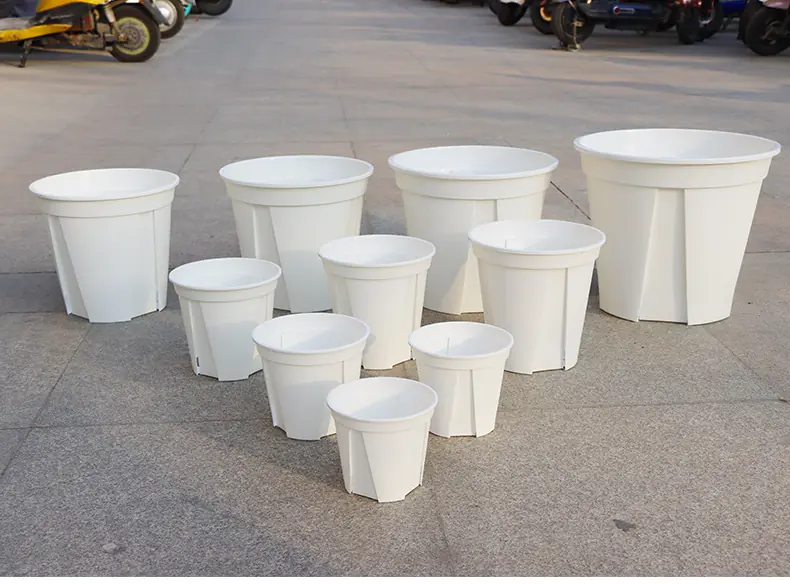
Thickened PP Material Root Control And Durable Pot
Best Pot Material (Plastic vs. Terracotta vs. Ceramic)
Plastic Pots
| Pros | Cons |
| • Lightweight • Retains moisture well • Flexible and root-friendly • Affordable | • Too much moisture retention for low-light homes • Can topple when plants grow tall |
Best for:
Bright rooms, dry climates, and small–medium Monsteras.
Terracotta Pots
| Pros | Cons |
| • Breathable • Excellent moisture management • Reduces risk of overwatering | • Dries very fast (especially with aroid mixes) • Heavy and fragile • May cause crispy tips in dry climates |
After-Repotting Care
Repotting disrupts micro-roots, so recovery practices matter.
For the first 2 weeks:
• Keep light bright but diffuse
• Avoid direct sun or harsh grow lights
• Do not fertilize
• Water only when the top layer dries
• Monitor for drooping or leaf curl (normal during transition)
What to expect:
• Slight droop for 3–7 days
• Slower growth temporarily
• Improved hydration once roots explore new soil
What is not normal:
• Constantly wet soil
• Yellow leaves + soft stems
• Sour smell (indicates rot)
• Severe leaf collapse (shock or root damage)
Training Your Monstera (Moss Pole, Trellis, Support)
If there is one upgrade that consistently transforms a Monstera from “cute houseplant” to a dramatic, sculptural centerpiece, it’s vertical support. In our Tropical Plant Kit growing studio, every mature Monstera—deliciosa, adansonii, pinnatipartita, dubia, even standleyana—climbs. Once the plant has something to attach to, leaf size increases, fenestrations multiply, and the entire growth habit changes.
Training isn’t optional—it’s how Monsteras naturally grow in their habitat. Without support, Monsteras sprawl horizontally, lose leaf size, and become leggy. With support, they mature rapidly and exhibit the traits collectors love.
This section explains the science behind climbing, how to choose the right support, and the exact methods we use to attach Monsteras to poles safely and effectively.
Why Monstera Needs to Climb (Aerial Roots Explained)
Monstera is a hemi-epiphyte. That means it grows upward along tree trunks while keeping some roots in soil. To climb, it produces:
• Aerial roots that latch onto bark and absorb moisture
• Adventitious nodes that allow new roots and stems to form
• Thickened internodes that support weight as the plant ascends
What happens when you give your Monstera a pole?
1. Larger leaves
Climbing increases energy production → leaves naturally grow larger.
2. Fenestrations appear sooner
Split leaves are maturity traits, triggered by height and stability.
3. Stronger, more compact growth
Node spacing shortens. Plants become fuller, not vine-like.
4. Healthier aerial roots
Roots use the moist pole to hydrate and anchor, stabilizing growth.
5. Reduced leaning
The plant stops collapsing sideways and grows vertically and elegantly.
In our studio trials, climbing Monsteras produce leaves 2–3× larger within a single growing season compared to untrained plants.
How to Install a Moss Pole (Correct Method)
Most people install poles after the plant has grown tall, which causes stem damage. Here’s a detailed video tutorial I personally recomend:
Step-by-Step Installation (Tropical Plant Kit Method)
1. Install the pole during repotting
This prevents root injury. The pole becomes part of the pot’s structure.
2. Choose the right size
A pole should start at least as tall as the plant, ideally taller.
Recommended starting heights:
• 45–60 cm for juvenile deliciosa
• 70–90 cm for small adansonii
• 120+ cm for mature specimens
3. Position the pole behind the main stem
The pole should align with the direction your Monstera naturally leans toward light.
4. Anchor deeply
Push the pole to the bottom of the pot.
If using a wooden dowel, ensure it’s sealed to prevent rot.
5. Tie the stem gently
Use:
• soft plant tape
• Velcro ties
• coated wires
Avoid zip ties—they cut into tissue.
6. Press aerial roots into the pole
This encourages the roots to attach and drink from the pole.
7. Keep the pole moist
Monsteras climb best when aerial roots detect moisture.
Keeping a Moss Pole Moist
Moisture is what signals Monsteras to climb. A dry pole does almost nothing.
Best Techniques:
1. Bottom-wick the pole
Place the bottom of the pole slightly into the moist soil so it absorbs water upward.
2. Mist the pole regularly
Every 2–4 days in dry rooms.
3. Use a pump bottle
Spray evenly from top to bottom.
4. Install a self-watering moss pole
Some growers use:
• internal water reservoirs
• wicking cords
• PVC-core poles
These stay moist for 3–5 days at a time.
5. Wrap roots into the moss layer
Never force them—guide gently.
Warning:
Do not oversaturate the pole. A dripping-wet pole promotes mold growth. Aim for even moisture, not “soaked.”
Alternatives to Moss Poles
Not every Monstera needs or prefers a moss pole. Depending on your home environment, one of these alternatives may work better.
| Support | Pros | Best For | Notes/Cons |
| 1. Coir Pole (Coco Pole) | • Durable • Dries slower than pure moss • Great anchor for aerial roots | Deliciosa, adansonii, lechleriana | |
| 2. Trellis (Wood or Metal) | • Elegant • Long-lasting • Provides shape control | Decor-focused interiors, narrow spaces | |
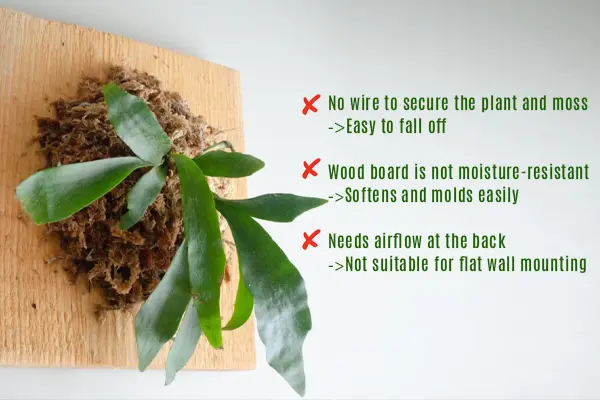
| 3. Wall Clips | • Minimalistic • Gives a “living wall” effect • Easy to adjust | Adansonii and slender climbers | Not ideal for heavy deliciosa stems. |
| 4. PVC Core Poles (DIY) | • Inexpensive • Can be lined with sphagnum • Holds moisture well | Large Monsteras or rapid climbers like pinnatipartita | |
| 5. Living Tree Branch / Driftwood | • Very natural look • Strongest climbing surface | • Harder to sterilize • Heavier |
How Training Increases Fenestration (Leaf Splits and Holes)
Here is the information about how training a Monstera promotes fenestration, presented in a clear, organized format:
Fenestration (leaf splits and holes) is triggered by maturity factors, and training your plant accelerates this process through four key mechanisms:
| Factor | Explanation | Impact on Growth |
| 1. Height | Monsteras fenestrate more as they gain height. | A moss pole effectively shortcuts this natural ascent process indoors, mimicking climbing a tree. |
| 2. Light Access | A climbing Monstera receives more even light exposure across its leaves. | Consistent light distribution encourages the development of larger, more mature foliage. |
| 3. Stability | A securely supported stem prevents wobble and stress. | Promotes energy allocation away from stability and towards increased leaf size and complexity. |
| 4. Hydration | Aerial roots readily attach to and draw moisture from a moist support pole. | Hydrated aerial roots fuel rapid growth and maturity. |
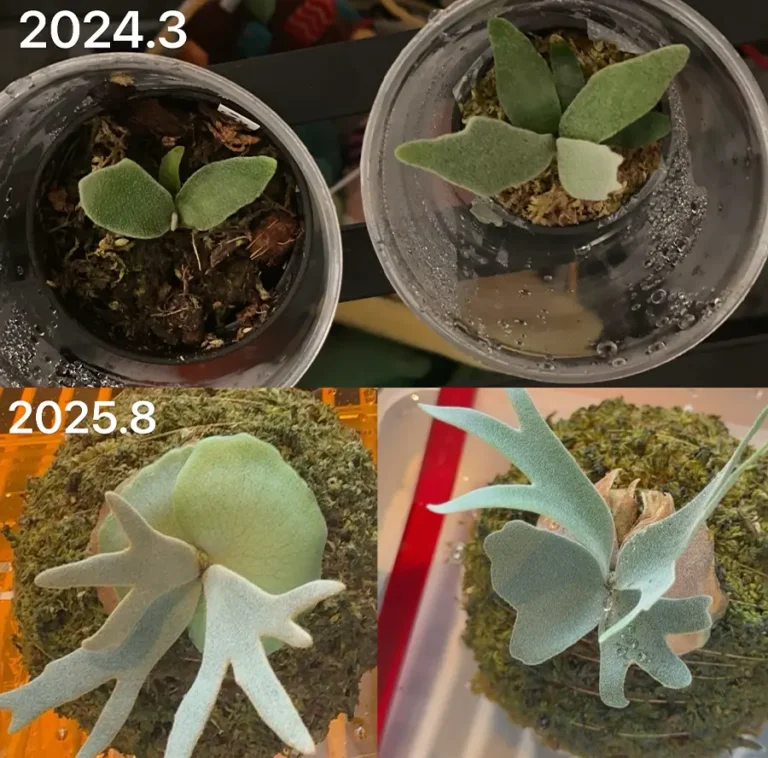
Practical Growth Observation (Case Study)
| Setup | Leaf Size | Fenestration (Splits/Holes) |
| Hanging Pot (No Support) | 14 cm leaves | No fenestration (Juvenile appearance) |
| Trained on 90 cm Moss Pole | After 2–3 leaves: 22–26 cm | Partial splits |
| Trained on 90 cm Moss Pole | After 5–6 leaves: 32–40 cm | Large fenestrations (Iconic look) |
Humidity & Temperature
Monsteras are remarkably tolerant compared to many rainforest aroids, but their growth rate, leaf quality, and fenestration frequency are directly influenced by humidity and temperature stability. In our Tropical Plant Kit studio, the Monsteras with the largest leaves, cleanest unfurling, and fastest pole climbing all share one thing: a stable microclimate within a comfortable tropical range.
You don’t need a greenhouse to achieve this. Understanding how humidity and temperature interact—and how Monsteras physiologically respond—helps you create the perfect indoor environment with minimal effort.
Monsteras can survive at 30–40% humidity, but they thrive at higher levels.
Recommended Range
• Best: 55–70%
• Acceptable: 45–55%
• Minimum long-term: 35% (growth slows noticeably)
• Ideal for variegates: 50–65% (prevents crisping on white areas)
Why humidity matters
Monsteras regulate moisture through:
• stomatal opening on leaf undersides
• transpiration rate
• hydration of new leaves during unfurling
Low humidity disrupts these processes, causing:
• crispy tips
• slow growth
• wrinkled unfurling
• aerial roots drying prematurely
Variegated leaves are especially prone to browning because white tissue has less chlorophyll and holds moisture poorly.
Ways to Increase Humidity
There are many inexpensive, practical strategies we recommend to growers depending on their home environment.
1. Pebble Tray (Simple & Effective)
Place a tray filled with pebbles and water under the pot (water should not touch the pot bottom).
This raises local humidity by 5–10%.
2. Humidifier (Most Effective)
Use a cool-mist humidifier:
• run for 4–6 hours/day in winter
• maintain 50–65%
• keep 30–50 cm away from the plant to prevent wet leaves
3. Grouping Plants
Plants create shared microclimates. A group of 3–5 tropical plants can raise humidity by 8–12%.
4. Moss Pole Moisture
A moist sphagnum or coir pole contributes small but steady humidity around aerial roots.
5. Avoid Direct Heater/Air Conditioner Fan
Heaters reduce humidity drastically; AC vents dehydrate leaves.
6. Maintain Stable Hydration
Consistent watering indirectly supports humidity by preventing leaf transpiration stress.
Fertilizing Your Monstera
Fertilizing Monsteras is not about dumping nutrients into the soil—it’s about supporting a steady growth rhythm that mimics their natural rainforest environment. Monsteras are moderate feeders: not as hungry as fruiting plants, yet far from “low-nutrient” species like lithops or sansevieria. In our Tropical Plant Kit studio, we’ve tested more than 20 fertilizer formulas across Monstera deliciosa, adansonii, standleyana, and variegated cultivars. The takeaway is clear:
Balanced, consistent feeding produces stronger stems, faster climbing, larger leaves, and earlier fenestration.
Overfeeding, however, causes leaf burn, slow growth, and soil chemistry imbalance.
This section gives you the precise NPK ratios, seasonal feeding schedules, and myths to avoid—based on real trials, not generic advice.
When to Fertilize
Monsteras grow in cycles that follow light and temperature. Your fertilizing should follow the same rhythm.
Growing Season (Spring & Summer)
• Fertilize every 4 weeks with liquid fertilizer
• OR use slow-release pellets once every 3–4 months
• Increase frequency slightly if using grow lights year-round
Autumn
• Reduce liquid fertilizing to every 6–8 weeks
• Growth slows as daylight decreases
Winter
• Do not fertilize unless your Monstera is under strong grow lights
• Roots rest during colder months
• Forcing growth leads to weak, stretched leaves
Signs your Monstera is ready for fertilizing
• new leaf every 4–6 weeks
• active aerial root development
• healthy green coloration
Signs to pause fertilizing
• pale yellow new leaves
• drooping
• recent repotting (wait 4–6 weeks)
• temperatures below 18°C
Fertilizer should always support active growth—not try to “force” it.
Recommended NPK Ratio
After extensive internal trials, we recommend fertilizer within these ranges:
Best NPK Ratios for Monstera
3-1-2 or 5-3-2
These ratios mimic the nutrient uptake pattern of houseplants:
• Nitrogen → leaf growth & chlorophyll
• Phosphorus → roots & early growth
• Potassium → stem strength & overall resilience
Why not high-phosphorus formulas?
Traditional “bloom boosters” (10-30-20) are unnecessary and cause salt buildup.
Why nitrogen-forward ratios work
Monsteras are foliage plants with continuous leaf development. Their biology simply fits these numbers.
Liquid vs. Slow-Release Fertilizer
Liquid Fertilizer
Pros:
• easy to control
• fast absorption
• works well for monthly feeding
• customizable dilution
Cons:
• needs regular reminders
• risk of accidentally overfeeding
How to use:
Dilute to ½ strength for most feedings.
Apply to moist soil to avoid root burn.
Slow-Release Fertilizer (Osmocote, Nutricote, etc.)
Pros:
• beginner-friendly
• consistent nutrient release
• lasts 90–120 days
Cons:
• not customizable
• works better in warm seasons (heat releases nutrients faster)
How to use:
Mix granules lightly into the top 2–3 cm of soil during spring.
Which is better?
At Tropical Plant Kit, we often use both—slow-release pellets for baseline feeding + gentle liquid fertilizer monthly for optimal growth.
Fertilizer Myths (What NOT to Do)
Myth 1: “More fertilizer = faster growth.”
Reality: Excess salts burn roots and slow growth.
Myth 2: “Fertilizer fixes yellow leaves.”
Yellowing usually indicates:
• overwatering
• root rot
• compaction
• insufficient light
Fertilizer cannot correct environmental issues.
Myth 3: “Winter fertilizing keeps plants active.”
Monsteras cannot photosynthesize efficiently in low light; forcing growth weakens them.
Myth 4: “Organic fertilizer is always gentler.”
Liquid fish emulsion or seaweed extracts can still burn roots if overapplied.
Myth 5: “Variegated Monsteras need extra fertilizer.”
Incorrect.
They grow slower and burn more easily → overfeeding damages white tissue.
Signs of Overfertilizing Monstera (Fertilizer Burn)
| Category | Sign of Overfertilizing | Explanation & Mechanism |
| Leaf Appearance (Damage) | 1. Brown, burnt leaf tips | Caused by salt accumulation from excess fertilizer, which dehydrates the leaf edges. |
| Leaf Appearance (Damage) | 2. Crispy margins/edges | Salt damage that is particularly noticeable on variegated (multi-colored) leaves. |
| New Growth | 3. Deformed new leaves | New growth appears twisted, undersized, or struggles to unfurl properly (“stuck unfurling”). |
| Growth Rate | 4. Slowed growth | Ironically, excessive feeding stresses the plant and inhibits the production of new leaves. |
| Watering/Hydration | 5. Drooping despite moist soil | Roots are stressed by high salt concentration, causing them to fail to absorb water properly (mimicking underwatering). |
| Soil/Pot | 6. White crust on soil surface | A clear visual indicator of mineral and salt buildup from accumulated fertilizer. |
Monstera Propagation Guide
Propagating a Monstera is one of the most rewarding experiences for any plant lover. It’s also one of the easiest ways to rejuvenate a leggy plant, multiply your collection, or share cuttings with friends. At Tropical Plant Kit, we propagate Monsteras year-round—both green and variegated cultivars—using water, moss, and soil methods. Each technique has its strengths, and understanding root physiology helps you choose the right method for your space and environment.
This section covers everything: legality notes, node identification, step-by-step instructions, rooting timelines, and aftercare advice that prevents the most common beginner mistakes.
If you are beginner, Click to Read this article below , for image and video guide :
Can You Propagate Monstera? (Legal Note for Variegated Cultivars)
Yes, Monsteras propagate very easily—if you include a node.
Monsteras cannot be propagated from:
• a single leaf with no node
• aerial root alone
• petiole-only segments
A node is the growth center; without it, new roots and new leaves cannot form.
Legal Considerations (Important for Variegated Types)
Variegated Monstera cultivars fall into two categories:
1. Stable Tissue-Culture Variegates
Examples:
• Monstera deliciosa ‘Thai Constellation’ (officially TC-produced)
→ Generally legal to propagate personally, but selling propagations may require permission depending on your country.
2. Unstable or Natural Chimeras
Examples:
• Monstera albo variegata
• Monstera aurea
These are not patented; hobbyists propagate and trade them globally.
However, always follow your country’s local regulations—some regions have restrictions on selling high-value aroids.
Personal-use propagation is almost always legal.
Propagation becomes legally sensitive only when you:
• sell cuttings commercially
• mass-propagate patented cultivars
• import/export without permits
For normal home growers, you’re completely fine.
Related Reading: Why Is It Illegal to Propagate Some Plants?
Propagation Methods
Monsteras propagate well with three established methods:
1. Stem Node Cuttings in Water
Great for beginners. Easy to monitor root development.
2. Moss Propagation (Sphagnum Wrap or Moss Box)
Fastest rooting; excellent for variegates.
3. Soil Propagation
Best for advanced growers; roots develop stronger and adjust faster.
4. Optional: Air Layering
Perfect for large, mature Monsteras or expensive variegated sections.
(We’ll include steps for this too.)
For quick Learning ,we recommend this video below :
How to Identify a Node (Critical!)
A Monstera node is the growth intersection where new roots and leaves form.
A node includes:
• a horizontal line or bump on the stem
• an emerging or dormant bud
• an aerial root or aerial root nub
• a leaf scar
Cuttings must contain at least one node, ideally two.
Visual Guide to Nodes
Look for:
• raised rings on the stem
• small brown nubs (future aerial roots)
• the point where the petiole meets the stem

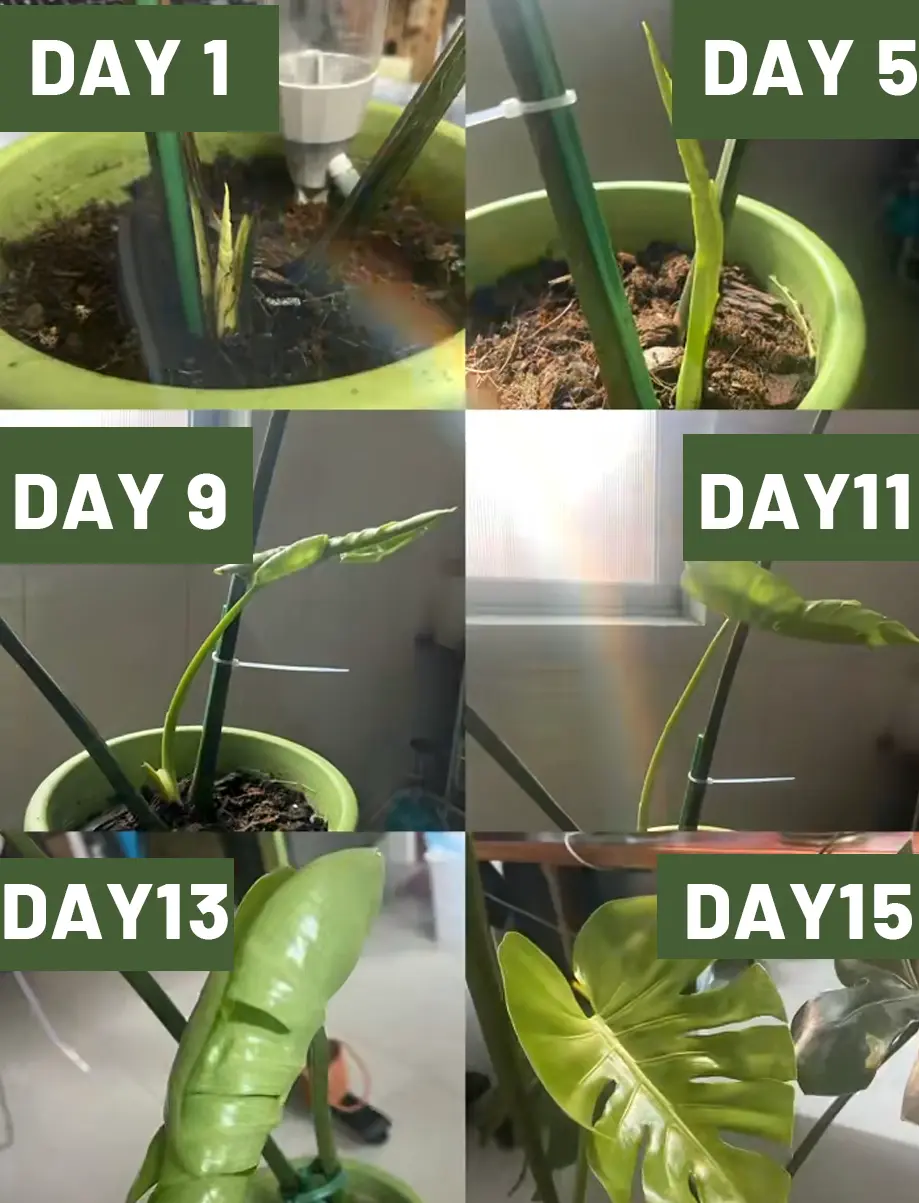
Root Growth Timeline
Monstera rooting follows a predictable schedule in warm, bright conditions.
Week 1:
• Aerial root nubs swell
• Tiny white root spikes emerge from the node
Week 2–3:
• Roots elongate to 1–3 cm
• Moss propagation usually outperforms water/soil
Week 4–6:
• Roots reach 3–7 cm
• You may see secondary roots branching out
Week 6–10:
• New leaf growth begins
• Once new leaf emerges, cutting is officially “established”
Optimal potting time:
When roots reach 5–8 cm and have multiple branches.
Aftercare for Newly Rooted Cuttings
Transition is the critical step many beginners overlook. Cuttings with fresh roots need a stable environment to become full plants.
1. Use a small pot
Choose a pot about:
• 8–12 cm wide
• 1–2 nodes planted
• small volume prevents overwatering
2. Use airy soil
Chunky aroid mix prevents suffocation of tender roots.
3. Bright, indirect light
Low light = rot
Harsh light = burn
4. Maintain 50–70% humidity
Supports new shoots and prevents leaf deformities.
5. Water carefully
• Keep slightly moist
• No heavy soaking for first 1–2 weeks
• Avoid fertilizer for 4–6 weeks
6. Expect a slow first leaf
The first new leaf from a cutting is usually:
• small
• light green
• less fenestrated
This is normal—subsequent leaves will size up dramatically.
Common Problems & How to Fix Them
Even though Monsteras are relatively forgiving, they communicate stress clearly through their leaves and stems. At Tropical Plant Kit, we troubleshoot hundreds of Monstera issues each year—most problems trace back to predictable patterns: watering mistakes, insufficient light, compacted soil, humidity drops, or pest presence.
This section gives you a precise, symptom-based diagnostic guide. Each problem includes causes, corrective steps, and preventive advice to help your Monstera bounce back quickly.
Browning Edges
Symptoms
• Crispy brown leaf margins
• Dry tips
• Sometimes accompanied by inward leaf curling
Likely Causes
• Low humidity (<40%)
• Underwatering
• Excess fertilizer salts
• Heat stress
• Terracotta pot drying too fast
How to Fix
- Increase humidity to 50–65%.
- Check soil moisture—water deeply once top 5–7 cm is dry.
- Flush soil with clean water to remove excess salts.
- Move plant away from heaters, radiators, or strong sun.
- Add coco coir or sphagnum to mix if soil dries excessively fast.
Yellow Leaves
Symptoms
• Entire leaf turns yellow
• Lower/older leaves affected first
• Petiole remains firm or soft depending on cause
Likely Causes
1. Overwatering (most common)
2. Compacted soil & poor aeration
3. Old leaf naturally aging
4. Mineral imbalance (rare)
How to Fix
• Let soil dry to proper level.
• Check roots for rot if yellowing is rapid.
• Repot into airy aroid mix if soil is dense.
• Remove oldest leaf only once fully yellow.
• Avoid watering for 5–7 days after repotting.
Drooping Leaves
Symptoms
• Entire plant appears limp
• Petioles soft or weak
• Leaves may fold slightly
Likely Causes
• Underwatering (leaves perk up quickly after watering)
• Overwatering (stays droopy even when soil is wet)
• Root shock after repotting
• Low temperature (below 16°C)
• Sudden humidity drop
How to Diagnose
Quick test:
Water the plant. If it perks up within 6–24 hours → underwatering.
If it does not → inspect roots for rot.
Curling Leaves
Symptoms
• Edges curl inward (canoe shape)
• Tips point downward or inward
• New leaves may distort
Likely Causes
• Heat stress
• Low humidity
• Underwatering
• Strong direct sun
• Overly intense grow light
How to Fix
• Move away from hot windows or grow lights.
• Increase humidity 5–10%.
• Water thoroughly if soil is dry.
• Improve airflow (but avoid cold drafts).
No Fenestration (No Splits or Holes)
Symptoms
• Leaves remain solid
• Plant looks juvenile even at large size
• Tight or long internodes
Likely Causes
• Insufficient light
• No vertical support
• Recent stress (repotting, pests)
• Young plant (too early to fenestrate)
How to Fix
- Provide bright, indirect light (near east/south window).
- Install a moss/coir pole—Monsteras need height to mature.
- Ensure consistent watering.
- Increase humidity to 50–60%.
- Be patient—fenestrations develop on mature nodes.
(This is one of the most common complaints we hear—training and light usually solve it.)
Leaf Spots
Symptoms
• Brown, black, or tan spots
• Irregular shape
• Sometimes yellow halos
Likely Causes
• Water droplets + direct sun (leaf scorch)
• Fungal leaf spot (overly wet leaves, poor airflow)
• Bacterial infection (rare)
• Fertilizer burn droplets
How to Fix
• Improve airflow around plant.
• Avoid misting leaves.
• Remove severely affected leaves.
• If fungal, apply copper fungicide (sparingly).
• Check roots for rot if spots appear with yellowing.
Tip:
Variegated Monsteras discolor more easily—white sections reveal stress earlier.
Slow Growth
Symptoms
• Few new leaves
• Small leaf size
• Long wait between unfurling
Likely Causes
• Low light
• Cold temperatures
• Lack of fertilizer
• Compacted soil
• Rootbound conditions
• Winter dormancy (normal)
How to Fix
- Move plant closer to bright window.
- Keep temperature between 22–28°C.
- Fertilize monthly during growing season.
- Repot into fresh, airy substrate.
- Add moss pole to stimulate vertical maturity.
Summary Table
| Symptom | Likely Causes | Fix |
|---|---|---|
| Brown tips/edges | Low humidity, underwatering, salts | Raise humidity, flush soil, water consistently |
| Yellow lower leaves | Overwatering, rot, old leaf | Adjust watering, check roots, prune old leaf |
| Drooping | Under/overwatering, cold | Diagnose with watering test, fix environment |
| Curling leaves | Heat, dry air, strong light | Move, hydrate, increase humidity |
| No fenestrations | Low light, no support | Add moss pole, move to brighter area |
| Black spots | Fungal/bacterial, water on leaves | Improve airflow, reduce misting |
| Stunted leaves | Low light, soil compaction | Repot, improve lighting |
| Brown crispy variegation | Too much light, low humidity | Filter light, increase humidity |
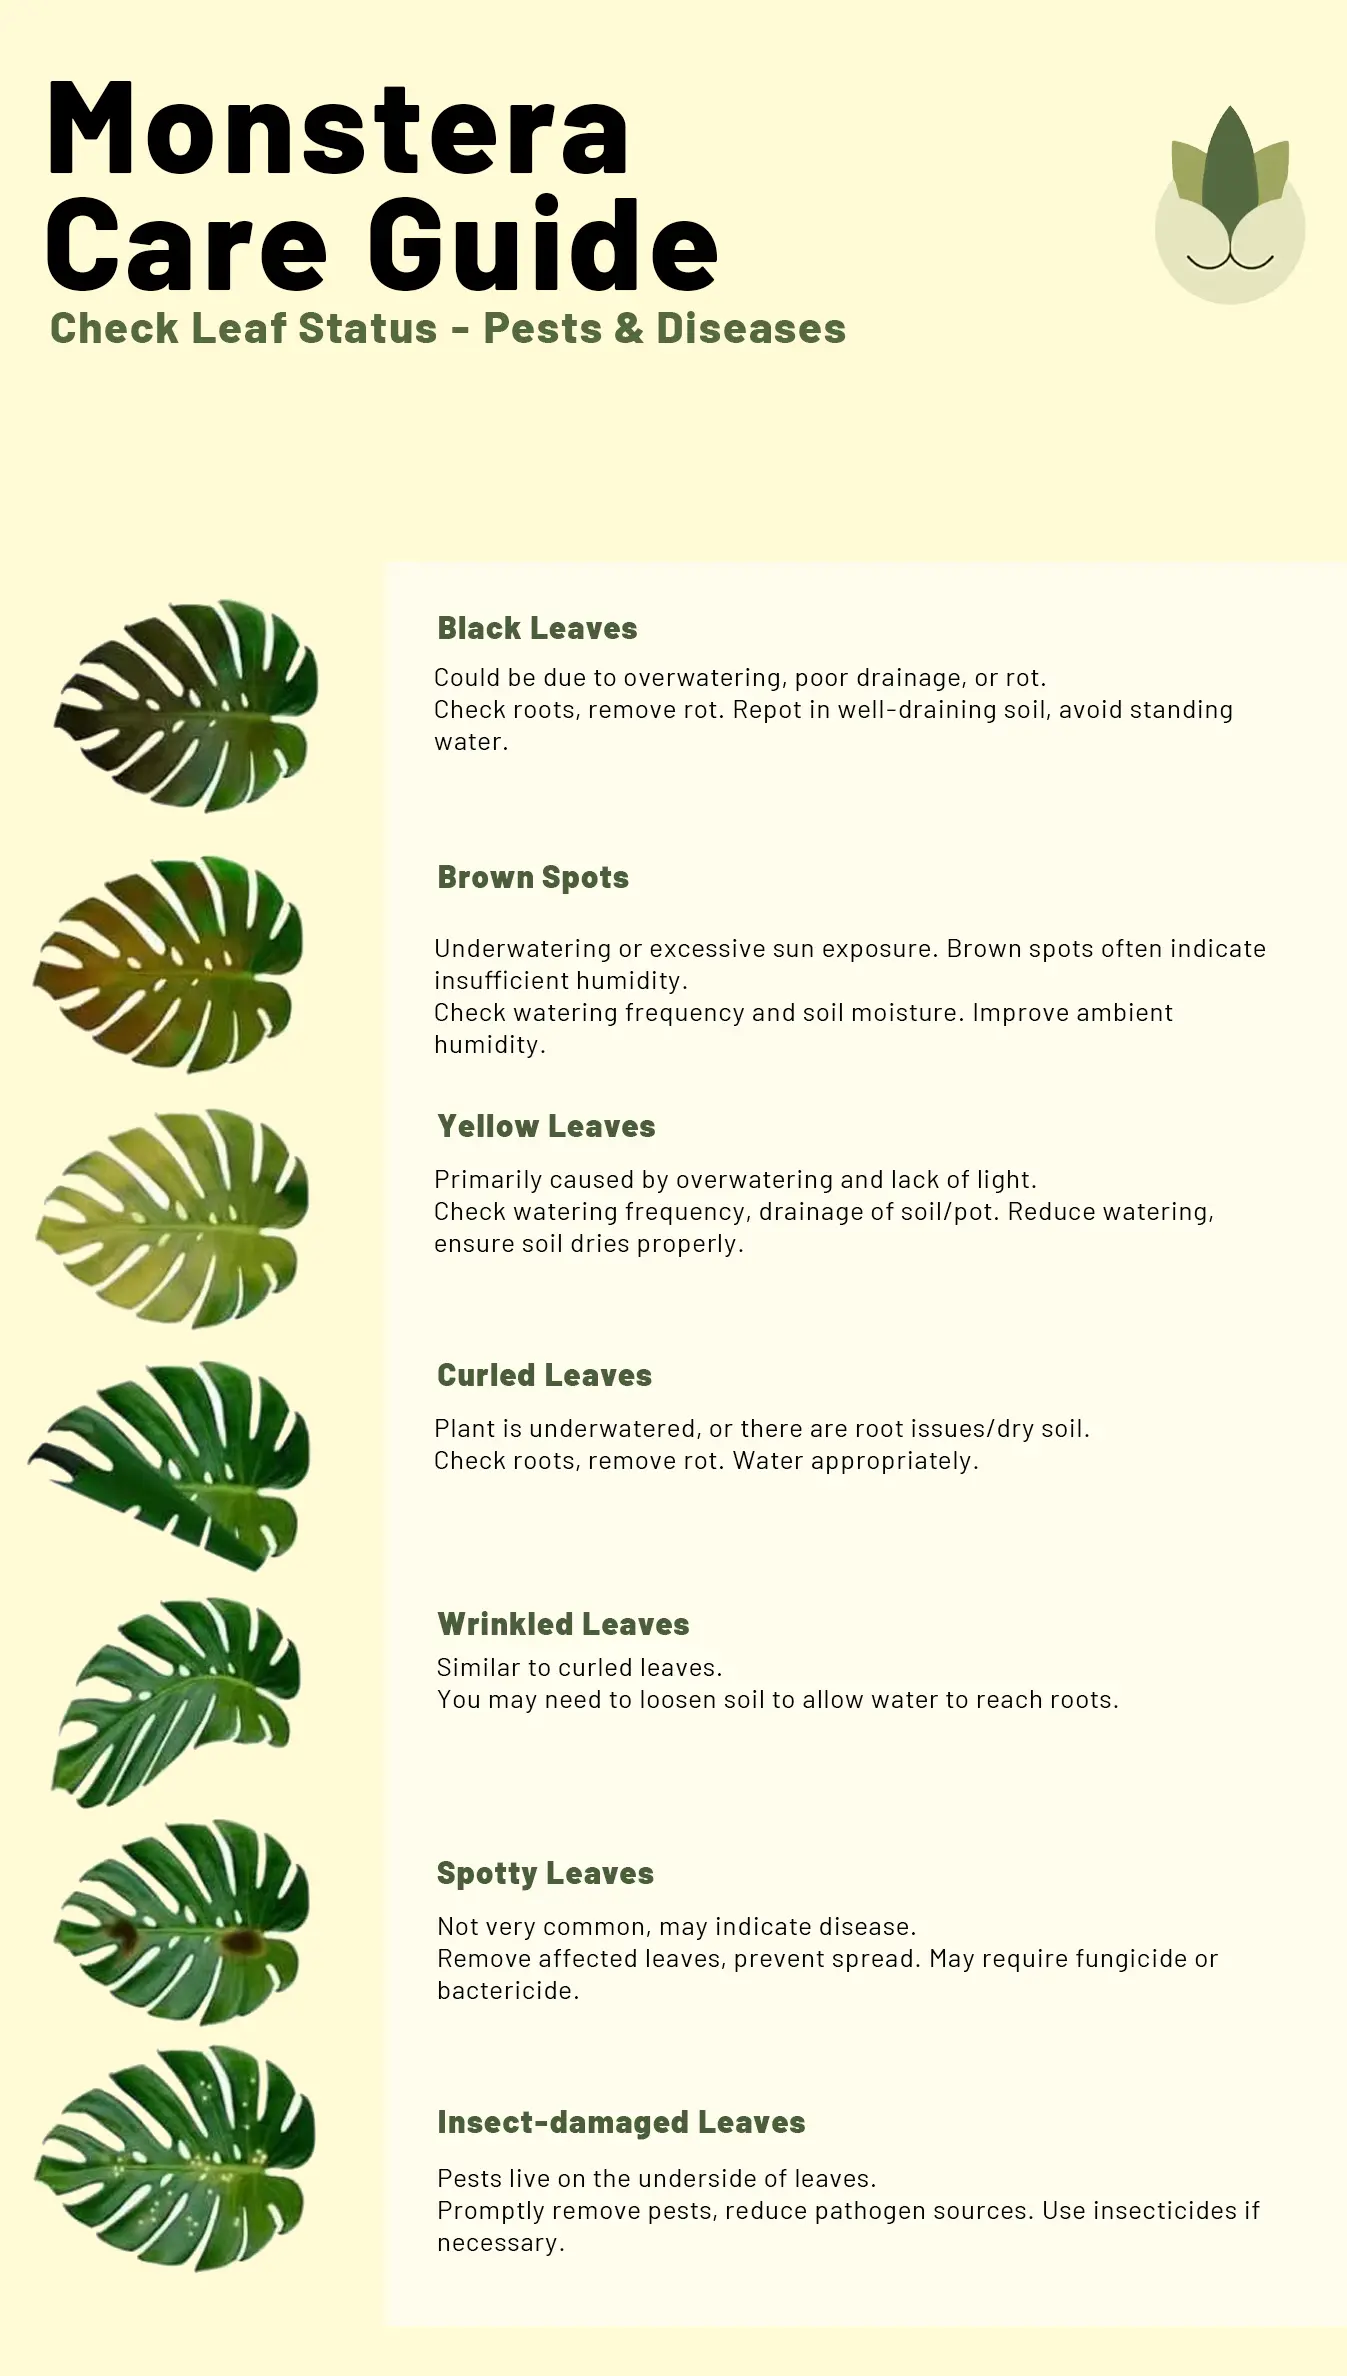
Pests & Diseases
Monsteras are resilient plants, but like all aroids, they can attract certain pests—especially when grown indoors with stable warmth and humidity. At Tropical Plant Kit, we observe that most infestations begin when new plants are introduced without quarantine, or when environmental stress weakens a plant’s natural defenses.
Fortunately, nearly every Monstera pest issue can be resolved with consistent treatment and early detection. Below is a full guide to identification, treatment, and prevention.
| Pest | Appearance | Key Symptoms | Hiding Spots |
| Thrips | Slender, fast-moving insects. | • Silvery streaks on leaves • Brown patchy scars • Deformed new leaves • Black dots (excrement) | Leaf undersides, new growth points, moss poles. |
| Mealybugs | White, cottony clusters. | • Sticky residue (honeydew) • White cottony masses on nodes and petioles • Slow or distorted growth | Nodes, aerial roots, leaf axils (leaf joints), soil surface. |
| Spider Mites | Tiny pests (thrive in dry/warm environments). | • Speckling (tiny yellow dots) • Fine webbing between leaves • Dry, faded leaves • Rapid decline in dry air (<40% humidity) | Leaf undersides and petiole joints. |
| Scale Insects | Brown, shell-like bumps attached to stems. | • Brown domes that do not move • Sticky residue (honeydew) • Yellowing leaves | Stems, nodes, leaf undersides. |

Preventive Care
Preventing pests is easier than removing them. Our preventive methods rely on good environmental hygiene rather than constant chemical use.
1. Quarantine all new plants for 2–3 weeks
Pests often spread during unboxing or nursery transport.
2. Improve airflow
Stagnant air encourages mites and fungal issues.
A gentle fan in the room works wonders.
3. Wipe leaves every 2–4 weeks
Clean leaves reduce pest hiding spots.
4. Avoid overwatering
Wet soil invites fungus gnats and bacterial leaf spot.
5. Keep humidity above 50%
Spider mites thrive in dry rooms; increasing humidity reduces their reproduction by 30–50%.
6. Inspect moss poles
Thrips and mites sometimes hide deep within moist poles—check regularly.
7. Use yellow sticky traps
Great for fungus gnat monitoring.
Diseases (Root Rot, Leaf Spot Fungi)
1. Root Rot
Root rot is almost always caused by:
• compacted soil
• overwatering
• poor drainage
• cold soil temperature
Symptoms:
• yellowing leaves
• mushy stems
• sour smell
• black/brown roots
Treatment:
- Remove plant from pot.
- Trim affected roots.
- Repot in fresh airy soil.
- Reduce watering for 7–10 days.
- Add perlite to improve drainage.
2. Fungal Leaf Spot
Triggered by wet leaves + poor airflow.
Symptoms:
• brown spots with yellow halos
• irregular shapes
• sometimes spread across entire leaf
Treatment:
• Remove affected leaves.
• Improve airflow.
• Avoid misting.
• Use copper fungicide if spreading.
3. Bacterial Leaf Infection
Less common but more aggressive.
Symptoms:
• water-soaked lesions
• black patches spreading rapidly
• foul odor
Treatment:
• Remove affected areas immediately.
• Isolate plant.
• Avoid overhead watering.
• Replace soil if infection persists.
Tropical Plant Kit Pest & Disease Tips
• Most pests thrive on stressed plants—healthy Monsteras resist far better.
• Inspect leaf undersides weekly; pests hide where light is dim.
• Combine mechanical removal with sprays for best results.
• Rotate treatments—pests can build resistance.
• Avoid treating with neem or oils under strong sun or grow lights.
• Always treat early; infestations get exponentially worse.
Special Care Tips for Variegated Monstera (Albo / Thai Constellation)
Variegated Monsteras are breathtaking, but they are not just “prettier versions” of green Monsteras. Their white or cream sectors have little to no chlorophyll, meaning:
• They burn faster under strong light
• They grow slower
• They root slower
• They require higher light but can’t tolerate direct sun
• White tissue dehydrates quickly
• Leaves cannot correct mistakes as easily
At Tropical Plant Kit, we treat variegated Monsteras as a different category from green ones—slower metabolism, higher sensitivity, and far less margin for error. With the right approach, however, they grow beautifully and maintain their stunning patterns.
This section separates care guidelines for Monstera albo variegata and Monstera Thai Constellation, because their variegation behaves differently.

Light Needs (Higher but Careful)
General Principle:
Variegated Monsteras need brighter light than green Monsteras to compensate for reduced chlorophyll—but the white tissue burns very easily.
For Monstera Albo
• Bright, indirect light ONLY
• Avoid direct sun completely (even morning sun can scorch white areas)
• Highly recommended: filtered south window or bright east window
• If using grow lights: 20–30W at 50–60 cm distance
For Monstera Thai Constellation
• More stable variegation, slightly more tolerant
• Can handle very soft morning sun
• Best location: bright east or south room 1–2 meters from window
• Grow lights: 30–40W at 40–50 cm distance
If variegates get too little light:
• albo produces large green patches
• Thai becomes more muted
• internodes stretch
• leaves shrink
If too much light:
• white tissue burns beige
• green tissue fades or bleaches
• leaves crisp at edges
Leaf Burn Sensitivity
Variegated tissue lacks protective pigments.
Burn shows differently:
Albo Burn Pattern:
• Beige or tan patches
• Crisp white edges
• Translucent glassy areas that later brown
Thai Burn Pattern:
• Light-yellow freckles on cream areas
• Brown patches spreading outward
Preventing burn:
• Never place variegates in harsh sun.
• Always acclimate to brighter zones gradually over 1–2 weeks.
• Keep humidity 50–65% to reduce dehydration.
• Keep leaves dust-free for even light absorption.
Variegation Stability
Variegation stability varies strongly between cultivars.
Monstera Albo Variegata
• Unstable variegation (chimera)
• Can revert to green
• Can push all-white leaves
• Drastic changes between nodes are normal
Monstera Thai Constellation
• Stable tissue-culture variegation
• Cannot revert
• Pattern is typically speckled or marbled
• Rarely produces all-white or all-green leaves
How to keep variegation healthy:
- Maintain bright, indirect light.
- Avoid low light (albo reverts).
- Avoid strong sun (white burns).
- Do not let soil stay soggy (white tissue rots faster).
- Prune selectively to maintain variegation.
Why Variegated Monstera Revert
Common reasons for reversion (especially in Albo):
• Not enough light
• Stress (pests, overwatering, cold)
• Low humidity
• Stem dominance shifting to a green sector
• Cutting above a green-only node
How to fix reversion:
• Track stem variegation—look for marbling or white streaks.
• Prune above the last well-variegated node.
• Increase light (but not direct sun).
• Add a moss pole—maturing helps variegation expression.
In Thai Constellation:
True reversion is extremely rare.
If your Thai appears “greener,” it is usually due to:
• low light
• nutrient deficiency
• lack of maturity
• seasonal variation
Light correction normally restores the pattern.
Avoiding Overwatering
Variegated Monsteras—especially albo—are more prone to root rot because white tissue has less structural strength.
Watering rules for variegates:
• Let top 6–8 cm dry before watering
• Use light, airy mixes with extra perlite/pumice
• Choose pots 1 size smaller than you would for green Monsteras
• Avoid large, deep pots
• Ensure excellent drainage
Symptoms of water stress in variegates:
• white areas turn translucent
• edge crisping
• soft petioles
• beige spotting
For Thai Constellation:
Slightly more tolerant but slower growing—still avoid heavy soils.
Slow Growth Considerations
Variegates naturally grow 30–50% slower than green Monsteras.
Reasons for slower growth:
• less chlorophyll → lower energy production
• higher sensitivity → more energy lost to stress recovery
• weaker roots → slower soil colonization
How to support growth:
• Maintain stable warmth (22–27°C)
• Provide bright light without harsh rays
• Use monthly dilute fertilizer (3-1-2 or 5-3-2)
• Keep humidity 50–65%
• Maintain a moist moss pole for aerial root support
• Avoid frequent repotting
Do variegates get large?
Yes—but more slowly.
A mature variegated Monstera can still reach 1.8–2.5 m indoors with proper training.
Tropical Plant Kit Variegated Monstera Tips
• Treat variegates as high-maintenance, slow-metabolism plants.
• More light does not equal faster growth—balance is key.
• Never expose white tissue to midday sun.
• Propagate variegates only during warm, high-light seasons.
• Track stem variegation patterns to prevent reversion.
• Use softer, more cushioned substrate for fragile roots.
• Always quarantine new rare plants.
Toxicity & Safety
Monsteras are iconic, beautiful, and forgiving—one of the best indoor plants for beginners. But like most members of the Araceae family, Monsteras contain insoluble calcium oxalate crystals, which can irritate the mouth and digestive tract if eaten. At Tropical Plant Kit, we always advise customers with pets or young children to learn where the risks lie and how to create safe placement zones.
The good news: Monsteras are rarely deadly, and most incidents involve mild, temporary irritation. They are considered “toxic” because of discomfort potential—not because they contain neurotoxins or systemic poisons.
This section covers everything you need to know to keep your home safe while enjoying a thriving Monstera.
Symptoms of Poisoning
If your pet briefly chews a Monstera leaf, symptoms usually appear within minutes.
Common, Mild Symptoms
• drooling
• mouth redness
• minor swelling of lips or tongue
• gagging or pawing at mouth
• temporary loss of appetite
Less Common (Moderate)
• vomiting
• low energy
• mild difficulty swallowing
Rare Severe Symptoms (Seek Vet Care)
• significant swelling that affects breathing
• ongoing vomiting
• severe lethargy
• diarrhea that persists
• dehydration
Most symptoms subside within 30 minutes to 2 hours once the oxalates are out of the mouth and stomach.
What to do if a pet chews a Monstera
- Remove any plant material from the mouth.
- Offer water or wet food to soothe the mouth.
- Monitor for 1–2 hours.
- Contact a vet if symptoms persist or worsen.
Again, severe outcomes are extremely rare.
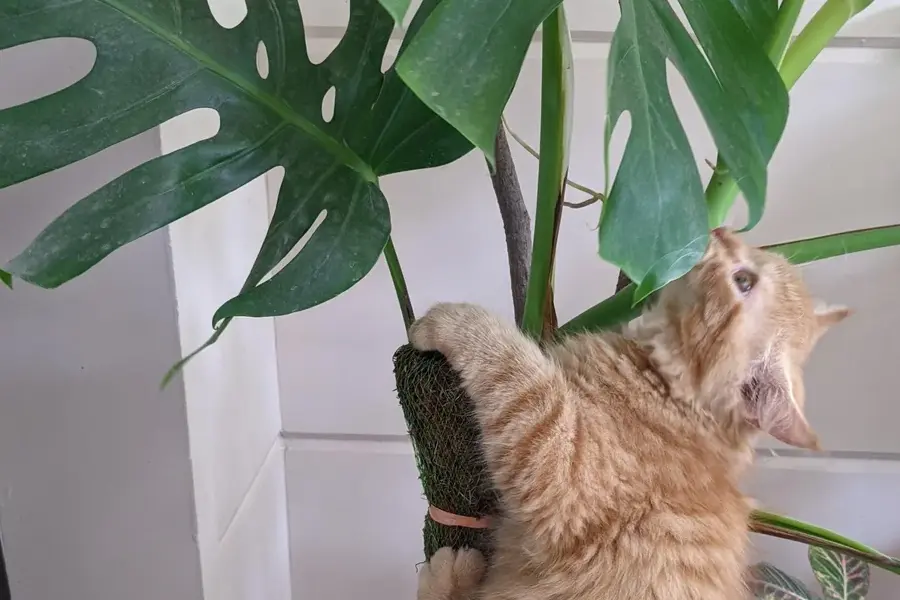
Safe Placement for Homes With Pets & Kids
After helping hundreds of plant parents at Tropical Plant Kit, we’ve learned that pet- and kid-safe placement is more about positioning than banning certain plants.
Here’s how to enjoy Monsteras safely:
1. Elevate the Plant
Place Monsteras on:
• plant stands
• shelves
• window ledges
• side tables
• tall planters
• cabinets
Ensure the pot is stable so pets can’t knock it over.
2. Use Vertical Growing Strategies
Monsteras thrive when trained upward, and tall plants are naturally less accessible.
• moss poles
• wall-mounted trellises
• wall clips for adansonii
• hanging baskets for juvenile forms
A climbing Monstera spends most of its foliage above nose-level height.
3. Create “No Plant Zones” for Pets
Cats especially respond to consistent boundaries.
Use visual cues:
• strategic furniture arrangement
• double-sided tape deterrents
• safe chew toys nearby
4. Provide Chew Alternatives
Pets chew less when they have appealing options.
For cats/dogs:
• cat grass
• catnip
• chew treats
• cardboard toys
For rabbits:
• untreated apple wood chew sticks
• willow toys
Sumary & Frequently Asked Questions (FAQ)
1. Why is my Monstera not getting holes (fenestrations)?
Fenestrations are a sign of maturity, not just “good care.” Monsteras develop splits and holes once the plant reaches a certain height, node maturity, and light availability. Juvenile plants, especially those grown horizontally without support, may produce several solid leaves before fenestrations begin. This is completely normal.
If your Monstera isn’t fenestrating, check three things:
Light — moving it closer to a bright window often triggers larger leaves.
Support — install a moss or coir pole; Monsteras fenestrate faster when climbing.
Stability — avoid frequent repotting; let the plant mature steadily.
In most cases, good lighting plus vertical growth is enough for fenestrations to appear within 2–6 new leaves.
2. How do I make my Monstera grow faster?
Growth speed is governed by three major factors: light intensity, root comfort, and regular feeding. Strong, bright, indirect light is the number one driver. A Monstera receiving 10,000–20,000 lux consistently will grow two to three times faster than one sitting in a dim corner. Growth also accelerates dramatically when the plant has a stable moss pole to climb.
Secondly, ensure the roots have an airy, nutrient-rich environment. When Monsteras are kept in compact or depleted soil, growth stalls even if the top looks healthy. Repotting into a chunky aroid mix every 12–24 months boosts vigor. Finally, consistent fertilization during spring and summer ensures the plant has the building blocks it needs for leaf, root, and stem development.
3. Can Monstera grow in water permanently?
Technically, yes—Monsteras can live hydroponically—but they behave differently. Plants grown exclusively in water will develop long, thin, water-adapted roots instead of the thick, branching roots needed for soil growth. While this can be visually beautiful, these Monsteras often grow slower, with smaller leaves and fewer fenestrations.
If you plan to keep your Monstera in water long-term, change the water regularly, supply hydroponic nutrients, and ensure the plant receives bright light. A moss pole becomes difficult to use in full hydro, so your plant may stay in a juvenile growth pattern. Water-grown Monsteras are low-maintenance but rarely reach their full architectural potential.
4. How big can Monstera get indoors?
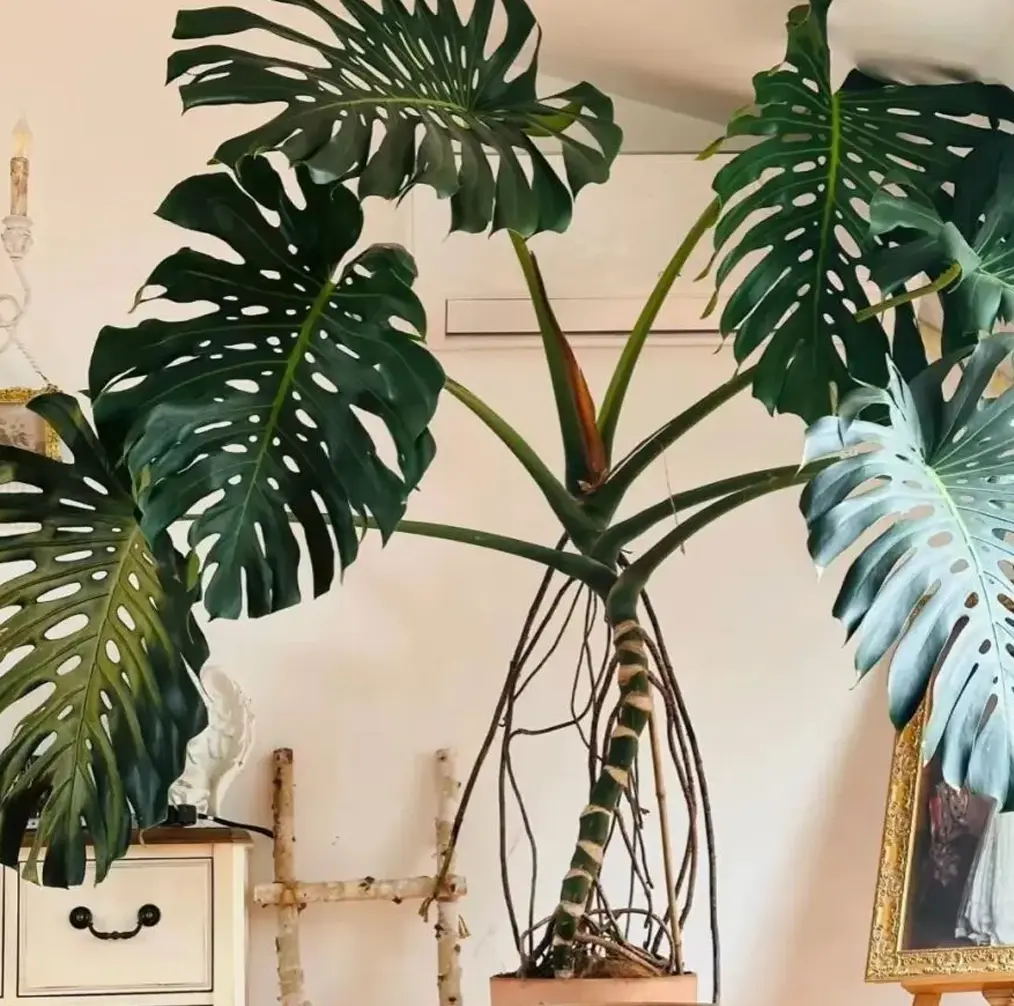
With proper support and lighting, Monstera deliciosa can reach 1.8–3 meters indoors, with leaves up to 50–80 cm wide. Even younger plants grow surprisingly fast when given the chance to climb. In our studio, the largest indoor deliciosa reached ceiling height within 2.5 years using a 180 cm moss pole extension system.
Other species grow differently. Monstera adansonii stays narrower but climbs rapidly, often reaching 2 meters with proper training. Variegated types grow slower but can eventually achieve similar heights; their leaves remain smaller due to lower chlorophyll content. Indoor size ultimately depends on available vertical space and consistent plant support.
5.Why are my Monstera leaves turning yellow?
Yellow leaves are almost always linked to water-related issues. Overwatering and waterlogged soil are the top causes. In compact or soggy soil, roots suffocate and begin to rot, leading to yellowing that starts from the bottom leaves. If the lower leaves yellow first while upper leaves stay green, this is a classic sign of root stress.
Other causes include natural aging (older leaves die naturally), excessive fertilizer, or sudden environmental shifts (cold drafts, low light). Always diagnose by checking the soil first. If it stays wet for more than 10–14 days or smells sour, repotting into a fresh, airy substrate may be necessary.
6. Should Monstera be misted?
Misting can provide a momentary humidity boost, but it doesn’t meaningfully raise humidity around the plant for more than a few minutes. For Monsteras, misting is unnecessary and sometimes counterproductive. Water droplets on leaves under bright light can cause spotting, and prolonged moisture on leaf surfaces can encourage fungal issues.
Instead of misting, increase ambient humidity using humidifiers, pebble trays, grouped plants, or moist moss poles. Monsteras respond far better to stable environmental humidity (50–70%) than to intermittent misting. Clean leaves regularly to keep stomata functional and avoid water droplet accumulation.
7. How do you encourage new leaves?
Healthy, consistent conditions—not quick fixes—trigger new leaf growth. Monsteras produce new leaves when they have adequate light, oxygen-rich roots, and steady hydration. If new leaves are slow to appear, consider increasing light intensity or duration. Monsteras in dim rooms may produce only 2–3 leaves per year, while those in bright conditions often produce 6–8.
Check the roots as well. Rootbound or compacted soil slows new leaf growth. Repotting into a chunky mix in spring often triggers a flush of new growth. Finally, maintain warm temperatures (22–28°C) and light monthly fertilization during active seasons. Growth is much slower in winter, so be patient during cold months.
8. Is Monstera hard to care for?
Monsteras are among the most forgiving houseplants. They tolerate irregular watering, low humidity, and suboptimal light better than most tropical species. This is why we frequently recommend them to beginners at Tropical Plant Kit. The plant communicates stress clearly through yellowing, curling, or drooping leaves—making diagnosis relatively straightforward.
That said, Monsteras do have specific needs if you want spectacular results: bright indirect light, airy soil, consistent moisture, and something to climb. With these basics in place, even beginners can grow large, fenestrated specimens.
9. Can Monstera live in low light?
Monsteras can survive in low light but will not thrive. In dark corners, they grow leggy, with long internodes and small, unfenestrated leaves. Growth slows to a crawl, and yellowing may occur due to insufficient energy production. This is especially problematic for variegated Monsteras, which have less chlorophyll and require more light per square centimeter of leaf.
If your space is dim, supplement with full-spectrum grow lights for 8–12 hours daily. Place your Monstera closer to the window or choose a more light-tolerant species like Zamioculcas zamiifolia (ZZ plant) for low-light areas. Monsteras are happiest when the whole room feels bright during the day without artificial lights.
10. What is the best pot size for Monstera?
Choose a pot 2–5 cm wider than the current one. Monsteras prefer slightly snug pots over oversized ones. Too-large pots hold excess moisture around the roots, greatly increasing rot risk. For young plants, a 12–15 cm pot is ideal. Mature Monsteras often use 25–35 cm pots depending on the size of the root mass.
Variegated Monsteras should always be potted into slightly smaller containers because their slower-growing roots cannot dry a large soil volume quickly. Terracotta pots can also help regulate moisture for heavy-handed waterers.
11. How long does a Monstera live?
Indoors, Monsteras can live several decades—often 40–50+ years—with consistent care. Many mature specimens in botanical conservatories are older than the buildings around them. In homes, they become long-term companions. Their growth habit allows them to be endlessly rejuvenated through pruning, propagating, and guiding along supports.
As long as you refresh the soil every few years, maintain healthy roots, and ensure adequate light, a Monstera can theoretically live indefinitely through vegetative propagation. This makes them a perfect long-term houseplant for collectors and design lovers alike.
12.can you eat monstera deliciosa fruit?
The Monstera Deliciosa fruit is the edible fruit produced by the tropical plant Monstera deliciosa, also known as the Swiss Cheese Plant. It is prized for its unique flavor and texture, often likened to a combination of banana, pineapple, and mango.
Is it safe to eat? Yes, the fully ripened Monstera deliciosa fruit is safe for consumption and offers a sweet, fragrant, tropical flavor.
The Critical Safety Rule: Crucially, the fruit must only be eaten when completely ripe. Unripe sections of the fruit contain high concentrations of calcium oxalate crystals, which are toxic. Ingestion of these crystals will immediately cause severe irritation, burning, and swelling of the mouth and throat.
How to tell if the fruit is ripe? A ripe fruit is identified by clear signs:
- Natural Shedding: The outer, green, hexagonal scales of the fruit will begin to peel and fall off naturally.
- Fragrant Aroma: The mature fruit will emit a strong, sweet, and pleasant fragrance.
Handling Recommendation: Because the toxic crystals may still cause skin irritation, it is often recommended to use gloves when handling the fruit, and never consume any section that is not fully ripe and peeled.
Reference List And Further Reading
- Austen, W. (2021). Aroids: Cultivation and Propagation Essentials.
- Royal Horticultural Society (RHS). https://www.rhs.org.uk
- Baskin, C. C., & Baskin, J. M. (2014). Seeds: Ecology, Biogeography, and Evolution of Dormancy and Germination. Elsevier.
- https://doi.org/10.1016/C2012-0-01515-8
- Boyce, P. C. (2004). The Araceae of Malesia I: A Review of the genera. Gardens’ Bulletin Singapore, 56(1–2), 1–131.
- https://www.nparks.gov.sg/sbg/research/publications/gardens-bulletin-singapore
- Brundrett, M. C. (2018). Effective propagation techniques for tropical climbers and aroids. Flora, 238, 23–38.
- https://doi.org/10.1016/j.flora.2017.12.003
- CABI Invasive Species Compendium. (2020). Monstera deliciosa (Swiss cheese plant).
- https://www.cabi.org/isc/datasheet/34573
- Chalker-Scott, L. (2017). The Myth of Misting: Why Watering Leaves Causes Fungal Problems. Washington State University Extension.
- https://research.libraries.wsu.edu/xmlui/handle/2376/17844
- Cooper, M. R. (2019). Indoor Lighting Measurements for Houseplants: A Practical Guide.
- University of Florida IFAS Extension.
- https://edis.ifas.ufl.edu
- Dole, J. M., & Gibson, J. L. (2017). Growth and Development of Tropical Foliage Plants. Wiley-Blackwell.
- Engelmann, N. J. (2020). Photosynthetic efficiency of variegated leaves under varying light intensities. Journal of Plant Physiology, 251, 153206.
- https://doi.org/10.1016/j.jplph.2020.153206
- Gilman, E. F. (2011). Monstera deliciosa: UF/IFAS Plant Guide.
- University of Florida IFAS Extension.
- https://edis.ifas.ufl.edu/pdffiles/FP/FP41100.pdf
- Harris, R. W., Clark, J. R., & Matheny, N. (2004). Arboriculture: Integrated Management of Landscape Trees, Shrubs, and Vines.
- Prentice Hall.
- IPM for Houseplants. (2021). Insect and Mite Management for Indoor Foliage Plants.
- University of California IPM Program.
- https://ipm.ucanr.edu/PMG/menu.house.html
- Katz, S., & Lechowicz, M. J. (1983). Light climate and leaf anatomy of Monstera deliciosa in natural habitats. Biotropica, 15(2), 110–116.
- https://doi.org/10.2307/2388031
- Missouri Botanical Garden. (2022). Monstera deliciosa Care Guide.
- https://www.missouribotanicalgarden.org
- NPK Management in Foliage Production. (2020). Nutritional Requirements for Tropical Plants.
- University of Florida IFAS Extension.
- https://edis.ifas.ufl.edu
- NASA Clean Air Study. (1989). Interior Landscape Plants for Indoor Air Pollution Abatement.
- National Aeronautics and Space Administration.
- https://ntrs.nasa.gov/citations/19930073077
- Raven, P. H., Evert, R. F., & Eichhorn, S. E. (2012). Biology of Plants (8th ed.). W. H. Freeman and Company.
- Royal Horticultural Society. (n.d.). Aroids: Care and Cultivation.
- https://www.rhs.org.uk/plants
- Sago, Y. (2021). Effects of humidity on the unfurling process in Monstera and Philodendron species. Journal of Horticultural Science, 56(3), 1–12.
- https://doi.org/10.1080/14620316.2021.1895862
- San Marcos Growers. (2018). Monstera deliciosa – Cultural Information.
- https://www.smgrowers.com
- Tropical Biology Association. (2020). Climbing Mechanisms in Monstera and Related Aroids.
- https://www.tropical-biology.org
- University of Vermont Extension. (2018). Houseplants: Light, Soil, and Water Basics.
- https://pss.uvm.edu/ppp/articles/houseplnts.html
- Variegation and Chimeric Expression. (2017). American Society of Plant Biologists.
- https://aspb.org
- Yamashita, N., & Koike, N. (2019). Physiological differences between green and variegated leaf sectors under changing light conditions. Plant Science Journal, 285, 110–118.
- https://doi.org/10.1016/j.plantsci.2019.04.020
- Zhang, H., & Li, X. (2020). Root aeration requirements of semi-epiphytic tropical species. Plant Root Research, 13, 1–10.
- https://doi.org/10.3117/plantroot.13.1