Table of Contents
Give roots oxygen, not just water—so your Monstera can actually use the light you’re providing.
If your Monstera isn’t growing, check oxygen first (not fertilizer)
If your Monstera isn’t growing (or new leaves stay small), the problem is often root oxygen, not fertilizer. In a dense, soggy mix, air spaces collapse and roots can’t “breathe,” so the plant struggles to take up water and nutrients—even in good light.
Before you change anything else, confirm you’re meeting the light baseline: Monstera Light Requirements (Simple Indoor Guide)
Airy, chunky aroid soil fixes that by improving drainage and reintroducing air after watering, which usually means faster growth, fewer yellow lower leaves, and fewer fungus gnats.
At a glance: what ‘airy soil’ means (and what to change)
| If you notice this… | What it usually means | What to do next (fast fix) |
|---|---|---|
| Pot stays heavy/wet 7–10 days | Mix is too fine / not enough air pockets | Add more bark + perlite/pumice; avoid oversizing pot |
| Yellow lower leaves after watering | Roots stressed from low oxygen | Reduce water-holding (chunkier mix) + confirm drainage + pot size |
| Fungus gnats keep returning | Top stays consistently moist | Increase chunk + let top dry 2–3 in (5–7 cm) |
| New leaves stay small / slow growth | Roots not functioning efficiently | Improve aeration first, then evaluate light + feeding |
| Soil dries unevenly (top dry, bottom swampy) | Perched water problem | Increase large particles; stop “sip watering” |
Quick answer: best soil for Monstera (with climate tweaks)
Airy soil means a chunky aroid mix that drains fast and keeps air pockets around roots. Your goal isn’t “dry fast” — it’s a healthy dry-down window.
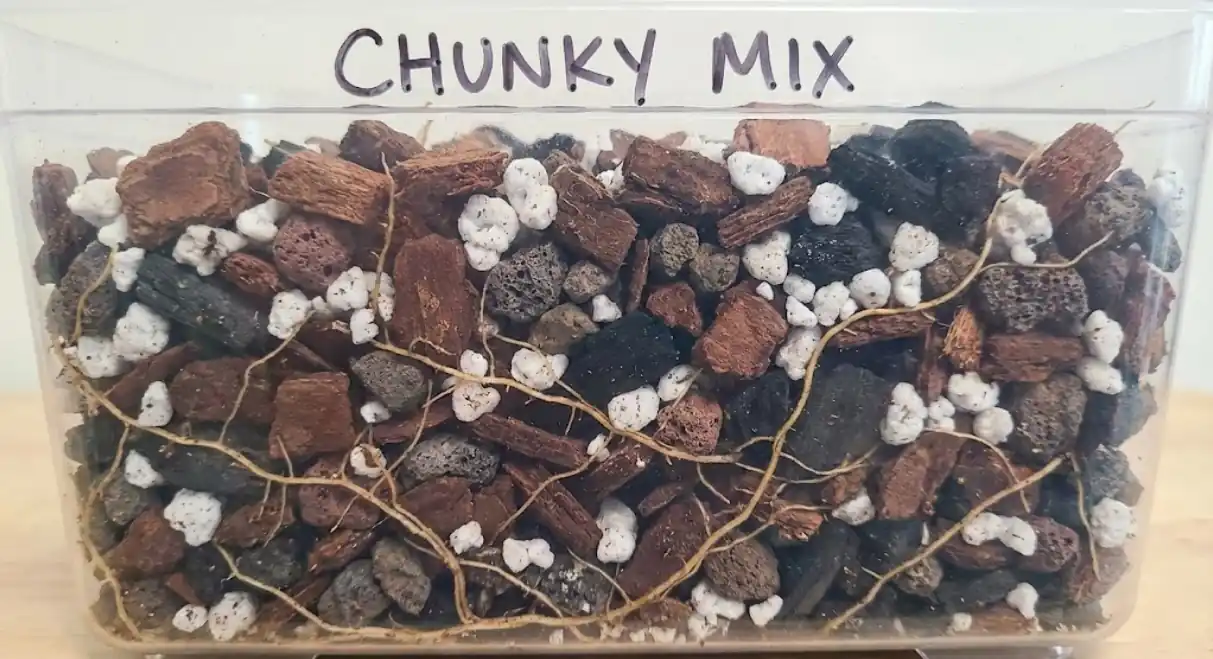
- Base beginner ratio (by volume): 40% potting mix / 30% orchid bark / 20% perlite or pumice / 10% coco chips
- Watering: soak fully → drain → wait until the top 2–3 inches (5–7 cm) is dry
- Dry-down target (most homes, active growth): the pot feels noticeably lighter in 4–7 days
- If it stays heavy/wet 7–10+ days: the mix is too dense or your conditions are cool/low light → use a chunkier “humid/low-light” variant below
Fast climate rule:
- Humid / low light / winter: more bark + pumice, less fine potting mix
- Dry air / strong sun / lots of airflow: slightly more moisture buffer (coco/coir), but keep it chunky
Watering rule: soak thoroughly → let it drain fully → water again when the top 2–3 inches (5–7 cm) are dry and the pot feels noticeably lighter. For water quality tips (e.g., fixing brown tips), check our Best Water for Monstera guide.
Fast test (diagnosis): if your pot stays heavy/wet 7–10 days after watering (average indoor conditions), your mix is likely too dense for a Monstera.
What each ingredient does (so you can substitute locally)
| Ingredient | What it does | Easy substitutions (geo-friendly) |
|---|---|---|
| Potting mix | Base + some moisture + nutrients | Any quality indoor potting mix (avoid “compost-heavy mud”) |
| Orchid bark | Structure + big air channels | Pine/fir bark, chunky bark chips (clean, plant-safe) |
| Perlite / pumice | Drainage + oxygen | Lava rock/scoria, coarse horticultural grit (not fine sand) |
| Coco chips | Moisture buffer without packing | Coarse coco coir, chunky husk chips |
Adjust the mix for your climate / indoor conditions (30-second tweak)
- Hot + humid homes (or low airflow): add more bark/perlite (ex: 35/35/25/5) to shorten “wet time.”
- Very dry homes / strong AC: keep the ratio but don’t skip the 10% coco chips (prevents over-drying).
- Low light / winter: keep it chunkier and avoid oversized pots (dense + low light = wet too long).
Soil’s real job: water + oxygen (why Monsteras stall in dense mix)
Most of us are taught that soil’s job is to “hold water and nutrients.” True—but incomplete.
Roots need oxygen to function
Monstera roots respire (they “breathe” in a plant way). In plain terms: roots need oxygen to power the processes that pull in water and nutrients. When soil stays dense and wet, air spaces collapse, oxygen drops, and roots shift from “working” to “surviving.”
Air pockets are where growth starts
Air pockets in soil (often called porosity) create space for:
- oxygen to reach roots
- carbon dioxide to leave
- excess water to drain
- fine roots to keep forming rather than rotting back
When those air spaces disappear, your Monstera may still look okay for a while—until it suddenly doesn’t.
Why Monsteras are extra picky about airy mixes (their growth habit explains it)
Monsteras are aroids. Many aroids are adapted to forest floors and climbing life—meaning they often experience quick drainage, lots of airflow, and pulses of moisture rather than constant saturation.
In nature, they don’t sit in mud
Even when Monsteras root in the ground, the surrounding organic matter is usually:
- chunky (leaf litter, bark, decomposing material)
- constantly aerated by insects and roots
- moist but not stagnant
That’s why a compact, peat-heavy mix that stays wet for days can be a silent growth limiter indoors.
Their “climber energy” relies on root health
When Monsteras are happy, they put energy into:
- thicker stems
- longer internodes (then shorter again in good light)
- aerial roots that seek support
- larger, more fenestrated leaves over time
Airy soil supports the root system that fuels all of that.
Best soil for Monstera deliciosa vs adansonii (and Thai Constellation)
All Monsteras like airy soil, but growth rate and rot sensitivity differ. Monstera deliciosa tolerates slightly more moisture buffer if light is strong. Adansonii often appreciates extra bark/perlite because it can slump fast in dense mix. Thai Constellation tends to be more rot-prone, so keep the mix extra chunky and avoid oversizing the pot.
For visual identification and care notes on these varieties (including Thai Constellation), see our guide to rare Monstera varieties and beginner-friendly Monstera varieties.
Adjust the soil mix for your climate + home conditions
Your climate and indoor setup control how long soil stays wet. Instead of chasing a perfect “universal” mix, aim for a target dry-down window.
Your target dry-down window
- Active growth season: pot noticeably lighter in 4–7 days
- Low light / winter / cool rooms: 7–12 days is common — you’ll usually need more chunk + smaller pot
- If your pot stays wet longer than your target window, adjust the mix structure, not just watering.
Pick your closest match (use the base recipe, then modify)
1. Humid / tropical homes (high humidity, slower evaporation)
Use more chunk so roots get oxygen between waterings.
- Humid variant ratio: 30% potting mix / 35% bark / 25% pumice or perlite / 10% coco chips
- If you’re also in low light, use: 25% potting / 40% bark / 30% pumice / 5% coco
2. Temperate “average indoor” conditions (most apartments/homes)
Stick close to the base recipe:
- Base ratio: 40% potting / 30% bark / 20% perlite or pumice / 10% coco chips
3. Dry air homes (strong AC, heaters, very low humidity)
Keep structure chunky but add a bit more moisture buffer so roots don’t swing bone-dry.
- Dry-air variant ratio: 45% potting / 25% bark / 20% pumice/perlite / 10% coco
- If you water frequently or have strong light: 50% potting / 20% bark / 15% pumice / 15% coco
4. Low light / winter / cool rooms (soil dries slowly)
This is where people accidentally rot Monsteras. Prioritize air + pot sizing.
- Low-light variant: 25–30% potting / 35–45% bark / 25–30% pumice / 0–10% coco
- Also: size the pot conservatively (see pot sizing section).
Pot material also changes the “right” mix
- Terracotta/breathable pots: dry faster → you can keep a bit more moisture buffer. Our breathable orchid planters are a great modern alternative for better airflow without traditional terracotta weight.
- Plastic/glazed ceramic: dry slower → go chunkier (more bark/pumice)
Monstera soil too dense? Symptoms → causes → fixes (fast troubleshooting)
A soil mix can be “wrong” even when your watering routine is consistent.
Troubleshooting table (copy/paste)
| Symptom (what you see) | Likely cause (what’s happening) | Fix (what to change) | How to confirm in 7 days |
|---|---|---|---|
| Slow growth / tiny new leaves | Roots lack oxygen; fine roots stop forming | Repot into chunkier mix; don’t oversize pot | New leaf emerges more “normal-sized”; pot dries more evenly |
| Yellow lower leaves after watering | Oxygen drop after saturation; early root stress | Increase bark + perlite/pumice; ensure full drainage; reduce pot size if oversized | Pot feels lighter sooner; less post-watering yellowing |
| Fungus gnats that keep returning | Constantly moist fine media supports breeding | Increase chunk; top-dry cycle; consider mosquito bits temporarily | Gnat count drops after 1–2 cycles |
| Pot stays heavy/wet 7–10 days | Mix holds too much water; perched water zone | Increase large particles; stop “rocks at bottom”; right-size pot | Pot weight noticeably drops in 4–7 days during growth season |
| Limp stems while soil is wet | Roots aren’t absorbing despite moisture (stress/rot risk) | Check roots; remove swampy soil; repot; water deeply then wait | Stems firm up; no “wet-but-thirsty” look |
Quick rules (so you don’t overcorrect):
- If your plant is in low light, go chunkier (less water retention).
- If your home is very dry or you run strong AC, keep a small moisture buffer (coco chips/coir), but stay chunky.
- Don’t “sip water” daily—water deeply, drain fully, then wait.
Perched water explained: why drainage holes aren’t enough (and how to fix it)
Quick diagnosis: If the top dries fast but the bottom stays wet, or your pot still feels heavy 7–10 days after watering, you’re usually dealing with perched water (a water table inside the pot).
What is perched water?
In containers, some water can remain trapped in the lower part of the pot because gravity can’t pull it through fine particles. When the mix has too many small particles (peat-heavy potting soil, compacted coco, fine compost), the air spaces collapse and a soggy zone forms near the bottom.
Key idea: drainage holes remove excess water, but the soil structure (particle size) controls how much water stays behind.
Why it slows Monstera growth
Monsteras (aroids) grow best when roots cycle between:
- deep watering
- then oxygen returning as the mix drains and re-aerates
When perched water keeps the bottom saturated:
- roots lose oxygen (“wet feet”)
- fine roots stop forming
- growth slows, lower leaves may yellow, and fungus gnats can thrive
The fix: increase “chunk,” not drainage tricks
To reduce perched water, the mix needs more large particles (macropores) so water can drain and air can re-enter.
Do this:
- Increase orchid bark + perlite/pumice (or similar chunky amendments)
- Use a pot size only 1–2 inches (2–5 cm) wider when repotting
- Water thoroughly → drain fully → wait until top 2–3 inches (5–7 cm) dries
Avoid this common mistake:
Adding rocks at the bottom doesn’t improve drainage. It often raises the perched water zone higher, meaning more of your pot stays soggy. The mix itself must be structured.
What “airy soil” really means for Monstera (simple checklist)
When we say airy, we mean the soil is engineered to hold water + oxygen at the same time.
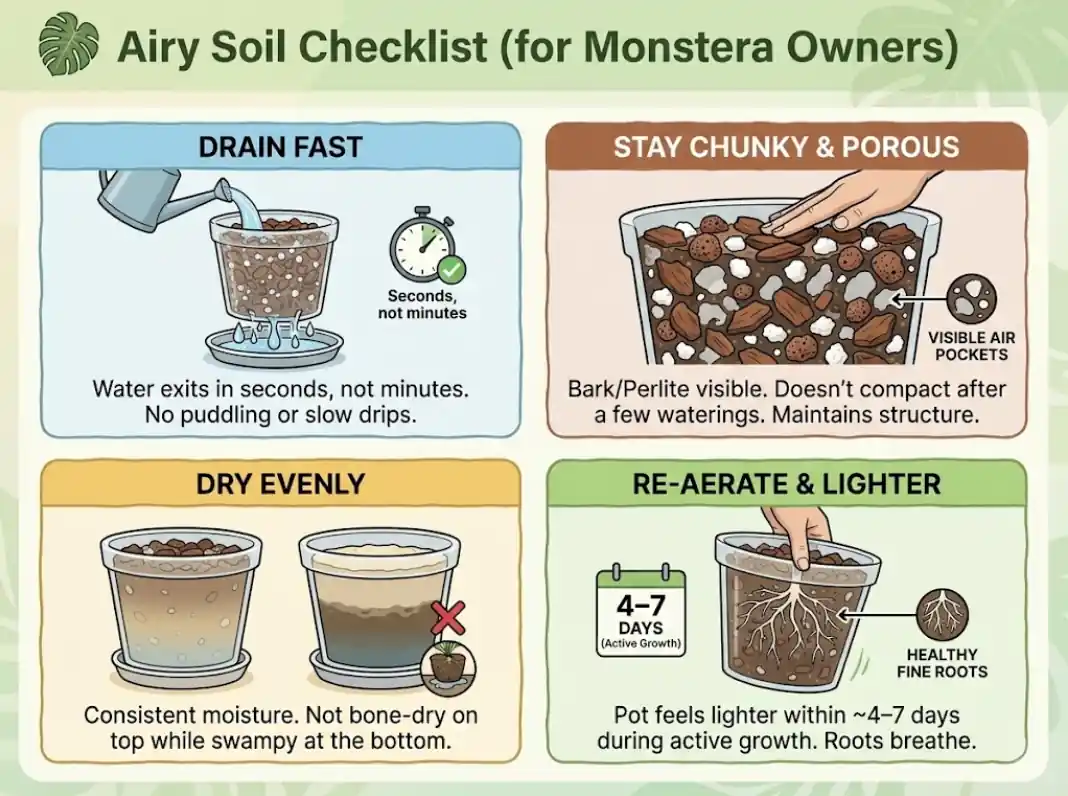
Airy soil checklist (for Monstera owners)
A good airy aroid mix should:
- Drain fast (water exits in seconds, not minutes)
- Stay chunky (bark/perlite visible; doesn’t compact after a few waterings)
- Dry evenly (not bone-dry on top while swampy at the bottom)
- Re-aerate after watering (pot feels lighter within ~4–7 days during active growth)
What it should look and feel like
A proper Monstera mix looks chunky, feels springy, and doesn’t pack down like cake batter. If it turns into a dense, muddy mass over time, it will recreate perched water—even if it drained well at first.
Monstera soil mix recipe (airy aroid mix, beginner ratio)
You can make this fancy or keep it easy. The goal is consistent structure and airflow.
Monstera soil mix recipe (base recipe + climate variants)
Start with the base recipe, then choose a climate variant if your pot stays wet too long (humid/low light) or dries too fast (dry air/terracotta).
Base recipe (by volume)
- 40% potting mix
- 30% orchid bark
- 20% perlite or pumice
- 10% coco chips (or coarse coco coir)
Climate variants (choose one)
| Home conditions | What to change | Example ratio (by volume) |
|---|---|---|
| Humid / tropical | more bark + pumice, less fine mix | 30/35/25/10 |
| Low light / winter | most chunky + smaller pot | 25/40/30/5 |
| Dry air / AC/heaters | slightly more moisture buffer | 45/25/20/10 or 50/20/15/15 |
| Terracotta pot | dries faster → keep buffer | base or dry-air variant |
| Plastic/glazed pot | dries slower → go chunkier | humid or low-light variant |
How to decide: track how long it takes for the pot to feel noticeably lighter after a full soak.
What we avoid for Monsteras (as the main component):
- straight peat-heavy mix with no amendments
- fine sand (can reduce airflow)
- garden soil (compacts, pests, inconsistent indoors)
Ingredient substitutions (what to use in your region)
Availability varies by country. These swaps keep the same function (structure + air + moisture buffer).
| If you can’t find… | Use this instead | Notes |
|---|---|---|
| Orchid bark | pine/fir bark, “orchid mix,” reptile bark, bark chips (small) | Aim for chunk, not dust. Rinse if very dusty. |
| Pumice | perlite, lava rock/scoria, expanded shale, coarse horticultural grit | Avoid fine sand (reduces airflow). |
| Coco chips | coarse coco coir, pine fines, parboiled rice hulls | If using coco products, rinse/soak if salty. |
| Quality potting mix | indoor potting mix with decent structure (not all peat dust) | If it compacts quickly, add more bark/pumice. |
| Charcoal | skip it | Nice-to-have, not required. |
“Function-first” mixing tip
When you swap ingredients, keep the roles:
- Base (potting mix): nutrients + water holding
- Structure (bark/chunks): prevents collapse
- Air/drainage (pumice/perlite): macropores
- Moisture buffer (coco chips/coarse coir): steadier moisture
Pot choice matters: airy soil works best with the right container
Airy mix is the main character—but the pot is the supporting actor.
Use a pot with drainage (non-negotiable)
We like:
- nursery pots inside decorative cachepots
- breathable options (like our breathable orchid planters or other modern indoor designs)
- appropriately sized pots (more on that below)
Browse our full collection of eco-friendly indoor planters for options that promote airflow and healthy roots.
Don’t oversize the pot
A pot that’s too large holds moisture longer than the roots can use it. That increases the time roots spend in low-oxygen conditions.
Rule of thumb: when repotting, go 1–2 inches wider than the current pot (not 4–6 inches).
Cachepot tip (if you love décor)
If you use a decorative outer pot:
- keep the plant in a draining inner pot
- empty excess water after watering
- don’t let the inner pot sit in runoff
This is especially important if you’re styling Monsteras in a clean, modern space—something we design for with eco-friendly planters and indoor plant pots that look good and keep roots healthy.
Watering changes when you switch to airy soil (in a good way)
Airy mixes drain faster, so people sometimes worry they’ll “dry out too quickly.” What usually happens instead is better control.
How we water in airy mix
- Water thoroughly until it runs out the bottom.
- Let it drain fully.
- Wait until the top 2–3 inches are dry (or the pot feels noticeably lighter).
Why this works
- roots get a deep drink
- then they get oxygen again
- the mix dries more evenly, reducing rot risk
If your Monstera is in brighter light or actively growing, you’ll water more often. In winter or lower light, less often.
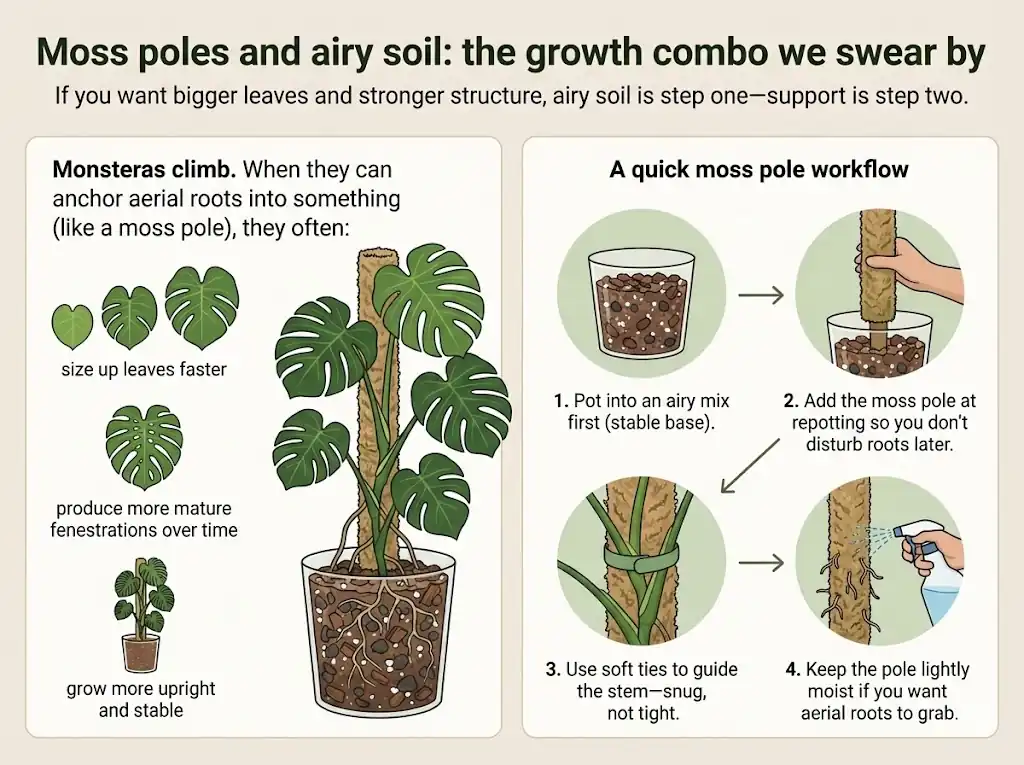
Moss poles and airy soil: the growth combo we swear by
If you want bigger leaves and stronger structure, airy soil is step one—support is step two.
Monsteras climb. When they can anchor aerial roots into something (like a moss pole), they often:
- size up leaves faster
- produce more mature fenestrations over time
- grow more upright and stable
We’re big on modular moss poles for vining tropicals—support + airflow = fewer struggles and more “wow” leaves.
A quick moss pole workflow
- Pot into an airy mix first (stable base).
- Add the moss pole at repotting so you don’t disturb roots later.
- Use soft ties to guide the stem—snug, not tight.
- Keep the pole lightly moist if you want aerial roots to grab.
This is why we’re big on moss poles and hanging systems for vining tropicals—support + airflow = fewer struggles and more “wow” leaves.
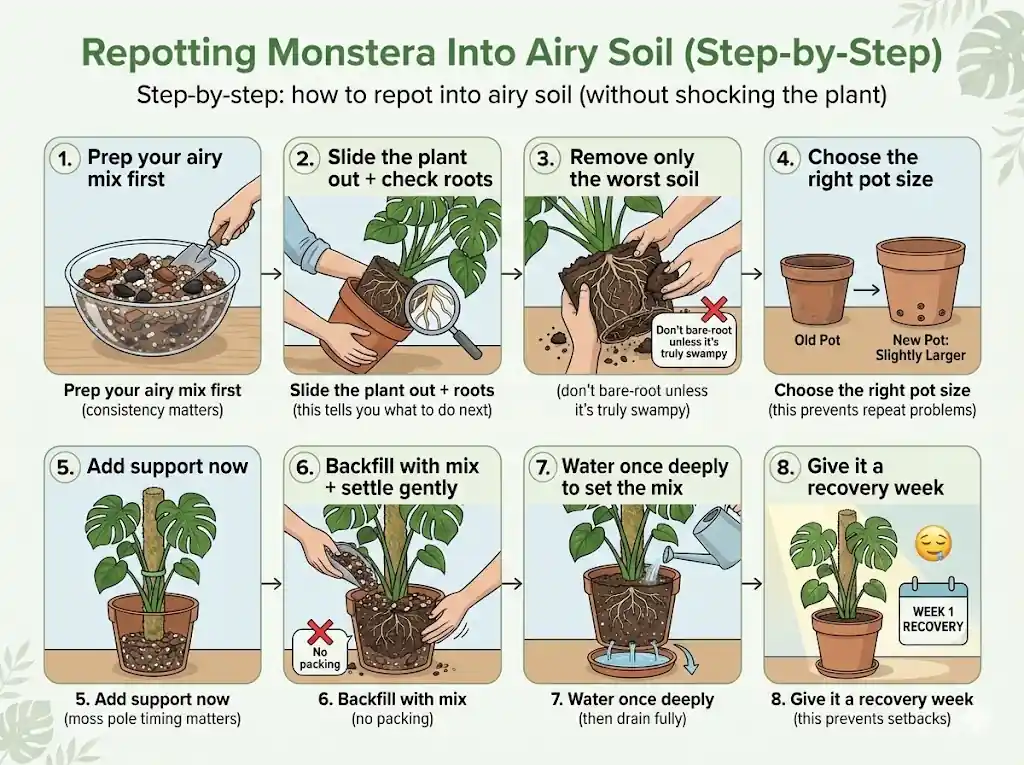
Repotting Monstera Into Airy Soil (Step-by-Step)
If your Monstera’s pot stays wet for 7–10+ days, you see yellow lower leaves after watering, or the mix feels dense and muddy, repotting into a chunky, airy aroid mix is one of the fastest ways to restore root oxyg qen and restart growth.
Best time to repot (and when to do it anyway)
Ideal season: spring through early summer (plants recover fastest during active growth).
Repot immediately (any season) if:
- Soil stays heavy/wet longer than a week
- You smell sour soil or see signs of rot
- Stems look limp even though the soil is wet
- Fungus gnats keep returning despite normal care
Why: in consistently low-oxygen soil, waiting for the “perfect season” can let root stress get worse.
Step-by-step: how to repot into airy soil (without shocking the plant)
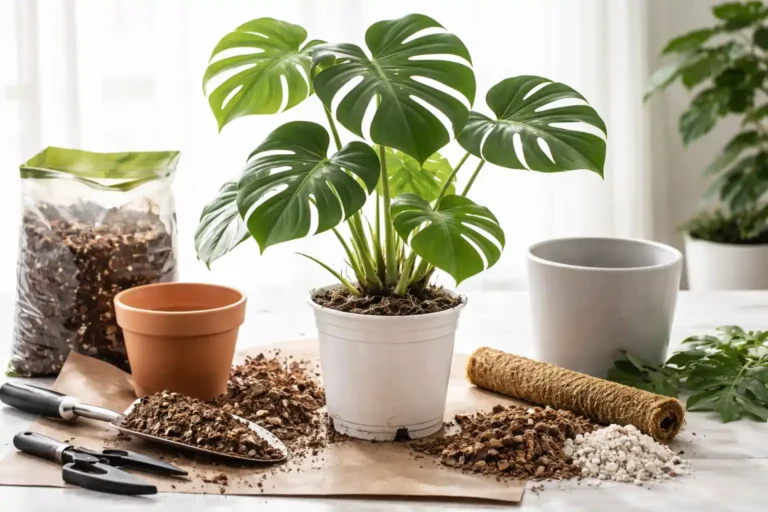
1. Prep your airy mix first (consistency matters)
Pre-mix your ingredients so every scoop drains the same. A consistent mix prevents “wet pockets” that stay swampy.
Quick reminder ratio (by volume):
40% potting mix / 30% orchid bark / 20% perlite or pumice / 10% coco chips
Geo-friendly swaps:
- No pumice? Use perlite or lava rock/scoria
- No orchid bark? Use pine/fir bark sold for orchids or reptiles
- Very humid home? Increase bark/perlite slightly
- Very dry home/strong AC? Keep the coco chips (moisture buffer)
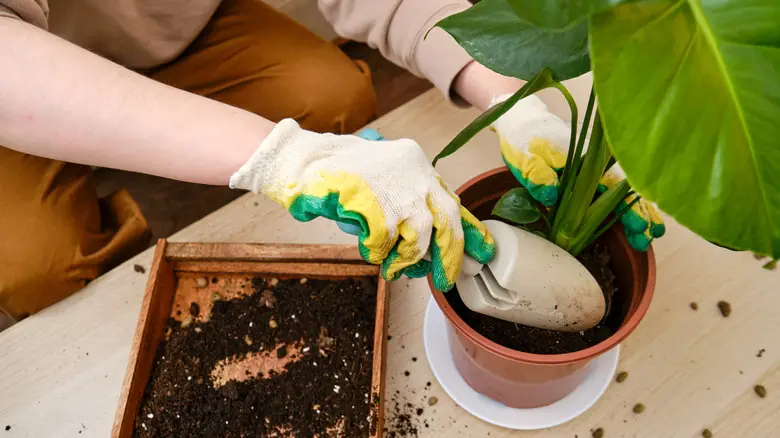
2. Slide the plant out + check roots (this tells you what to do next)
Gently tip the pot and slide the root ball out.
Healthy roots usually look/feel like:
- firm, springy
- pale cream to tan
- mild “earthy” smell
Warning signs (repot more urgently):
- mushy, black/brown roots
- sour/rotten smell
- slimy sections
If you find rot: trim only the mushy roots with clean scissors and let the plant sit 10–20 minutes while you prep the pot.
(Tip: if your plant has multiple stems, this is also a great time to propagate—see our Monstera propagation methods.)
3. Remove only the worst soil (don’t bare-root unless it’s truly swampy)
You don’t need to scrub the roots clean.
Do this instead:
- loosen the outer 20–30% of the mix
- remove compacted, muddy sections (especially near the bottom)
- keep healthy roots and their “familiar” soil intact
Bare-root only if:
- the mix is sludge-like
- there’s strong sour smell
- the bottom is consistently swampy
4. Choose the right pot size (this prevents repeat problems)
Rule: go 1–2 inches (2.5–5 cm) wider than the current pot.
Bigger isn’t better—oversized pots keep airy mixes wet too long and can undo the whole point of repotting.
Pot must have drainage holes (non-negotiable).
5. Add support now (moss pole timing matters)
If you plan to use a moss pole, add it during repotting so you don’t stab roots later.
- position the pole close to the main stem
- plan the plant’s “front” and growth direction
- use soft ties (snug, not tight)
6. Backfill with mix + settle gently (no packing)
Fill around the root ball with your airy mix.
Key rule: don’t compress hard.
You want structure and air pockets, not “cake batter.”
Lightly tap the pot to settle gaps, then add a bit more mix if it sinks.
7. Water once deeply to set the mix (then drain fully)
Water thoroughly until it flows from the drainage holes.
Then let it drain completely.
This “first soak” helps the mix settle and hydrates the roots—without leaving the bottom sitting in runoff.
8. Give it a recovery week (this prevents setbacks)
For the next 7–10 days:
- keep light bright but stable (avoid harsh sudden changes)
- don’t fertilize for 2–4 weeks
- don’t water again until the top 2–3 inches (5–7 cm) is dry and the pot feels lighter
What you should see: less droop after watering, fewer yellowing lower leaves, and better “pot weight drop” within the week.
Quick checklist after repotting (to confirm you nailed it)
- Water drains out within seconds, not minutes
- Mix looks visibly chunky (bark/perlite easy to spot)
- Pot feels noticeably lighter within 4–7 days in active growth
- No sour smell, no persistent gnats
- New growth gradually sizes up over the next few weeks
Common mistakes and quick fixes
Mistake: “Airy” but too dry
Fix: Add a small moisture buffer (coco coir/coarse coco) and water thoroughly each time.
Mistake: Too much potting soil, not enough chunk
Fix: Increase orchid bark and perlite/pumice until the mix visibly holds structure.
Mistake: Overpotting
Fix: Size down or repot into a better-fitting container.
Mistake: Watering in tiny sips
Fix: Water deeply, then wait. Small sips keep the bottom wet and the top dry—worst of both worlds.
Mistake: No support, then disappointment about leaf size
Fix: Add a moss pole at the next repot; guide growth upward.
Quick checklist: Is my Monstera soil airy enough?
Use this 60-second check after watering. If you hit 4+ “Yes” answers, your mix is likely in the sweet spot for root oxygen and steady growth.
Airy soil checklist (yes/no)
- Fast drain: Water runs out of the drainage holes within 5–15 seconds (not minutes).
- Chunky structure: You can clearly see orchid bark + perlite/pumice throughout the mix (not just on top).
- No “swampy bottom”: The pot doesn’t stay heavy and cold-wet— it feels noticeably lighter within 4–7 days during active growth.
- Even dry-down: The top doesn’t turn bone-dry while the bottom stays soggy (a common perched-water sign).
- Low gnat pressure: You don’t have persistent fungus gnats with normal care.
- Leaves are sizing up: New leaves gradually get bigger (and fenestrations increase over time in good light).
- Healthy roots at checks: Roots look firm and pale/cream to tan, not mushy, black, or sour-smelling.
Quick interpretation:
- If drainage is slow and the pot stays wet a week+, your mix is likely too dense.
- If it dries extremely fast (1–2 days) and the plant droops often, your mix may be too airy / too dry (add a small moisture buffer like coco chips/coarse coir).
Key takeaways
- Airy soil = oxygen + water balance. Monstera roots need oxygen to function—without it, growth stalls even with great light.
- Dense mixes can “keep it alive” but limit performance. You may get fewer/new smaller leaves, yellow lower leaves, and slower size-ups.
- Drainage holes aren’t enough. The particle structure of the mix controls perched water and airflow.
- Beginner-friendly Monstera soil mix (by volume):
40% potting mix + 30% orchid bark + 20% perlite/pumice + 10% coco chips/coarse coir - Pot size matters as much as the mix. When repotting, go 1–2 inches (2–5 cm) wider, not several sizes up.
- Bigger leaves need roots + support. Airy soil + a moss pole (or similar support) is the fastest path to mature growth indoors.
- Water correctly in chunky mixes: Soak thoroughly → drain fully → wait for partial dry-down. Avoid daily “sip watering,” which keeps the lower pot zone constantly wet.
For complete Monstera care beyond soil (including light, propagation, and more), explore our full Monstera Care Ultimate Guide.
FAQ
How do we know if our Monstera soil is too dense?
If the pot stays heavy and wet for more than a week (in typical indoor conditions), or you see yellowing lower leaves after watering, it’s often a sign the mix is holding too much water and not enough air.
Can we just add perlite to regular potting soil?
Yes—adding perlite helps. But for Monsteras, we usually get better results by adding both perlite/pumice and bark, because bark improves long-term structure (so the mix doesn’t collapse).
Is cactus soil good for Monsteras?
Sometimes as a base, but many cactus mixes are still quite fine or sandy. Monsteras generally do better with chunky aroid-style structure rather than “dry desert” texture.
Should we let the soil dry out completely?
Not usually. Monsteras like a cycle: thorough watering → partial dry-down. Bone-dry for long periods can slow growth and stress leaves.
Does airy soil mean we need to fertilize more?
Not automatically. Airy soil can drain faster, so nutrients may flush a bit more quickly, but growth is usually limited by light + roots first. Once your plant is actively growing, a gentle, consistent feeding routine can help.
References (APA)
Chen, J., & McConnell, D. B. (2005). Aroids (Araceae): Indoor foliage plants. University of Florida IFAS Extension.
Hartmann, H. T., Kester, D. E., Davies, F. T., & Geneve, R. L. (2018). Hartmann & Kester’s plant propagation: Principles and practices (9th ed.). Pearson.
Abalos, K. M., Oetting, R. D., & van Iersel, M. W. (2002). Effect of soilless potting media and water management on development of fungus gnats (Diptera: Sciaridae). HortScience, 37(6), 919–923.
Bayabil, H. K., Tilahun, F. T., Li, Y., & Campoverde, E. V. (n.d.). Moisture retention and chemical properties of nursery potting substrates (Publication AE562). UF/IFAS Extension (EDIS).
Barrett, G. E., Alexander, P. D., Robinson, J. S., & Bragg, N. C. (2016). Achieving environmentally sustainable growing media for soilless plant cultivation systems – A review. Scientia Horticulturae, 212, 220–234.
Caron, J., & Nkongolo, V. K. N. (1999). Aeration in growing media: Recent developments. Acta Horticulturae, 481, 545–552.
Raviv, M., Lieth, J. H., & Bar-Tal, A. (Eds.). (2019). Soilless culture: Theory and practice (2nd ed.). Elsevier.