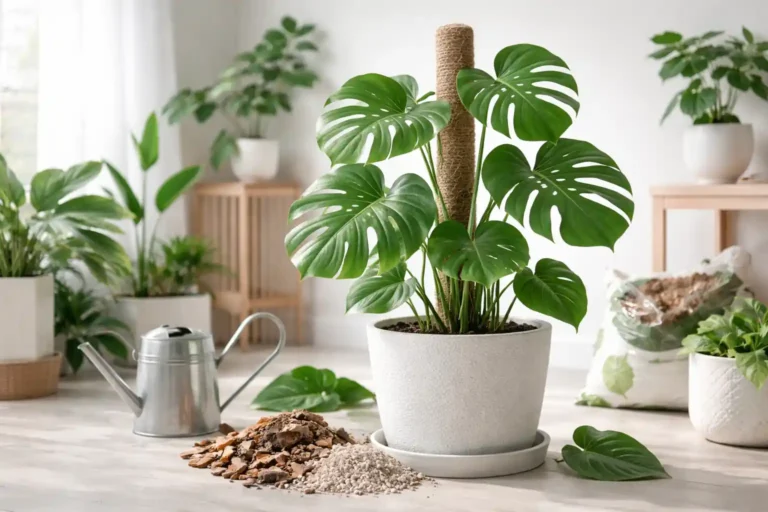
Most people start with Platycerium bifurcatum (bifurcatum staghorn / elkhorn fern) as their first staghorn because it forgives mistakes. This species tolerates a wider range of home conditions, media choices, and light levels than many collector types, and its root system can become surprisingly strong once it settles in.
For a wall-mounted board, we care for bifurcatum by giving bright, indirect light, a breathable mount mix that dries on the “dry side,” and soak-style watering only when the board feels noticeably lighter. We keep airflow moving around the back of the mount, protect the crown from standing water, and refresh the surface moss when it turns green and thick enough to reduce airflow. Mounted bifurcatum is one of the safest “first board projects” because it adapts fast and roots hard.

A mounted elkhorn fern is not just a plant on a board. The board, the moss, and the airflow behind it act like the “pot.” Once we learn how that system dries, the care routine becomes simple and consistent.
What should we do with a new elkhorn fern before mounting it?
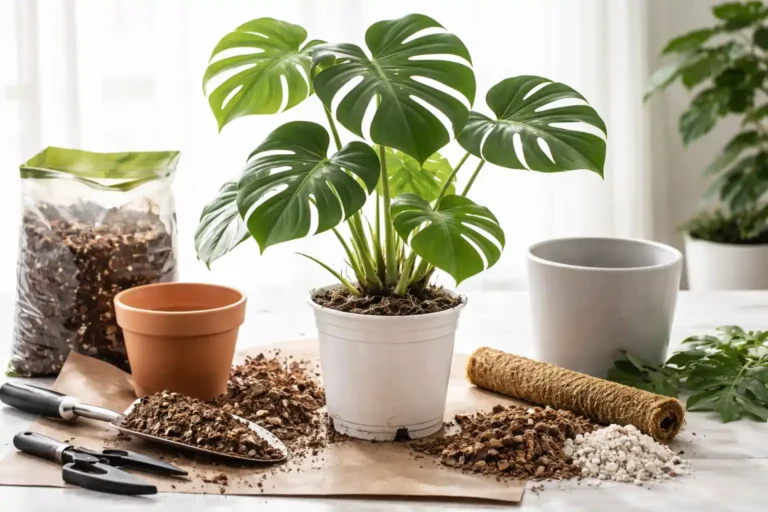
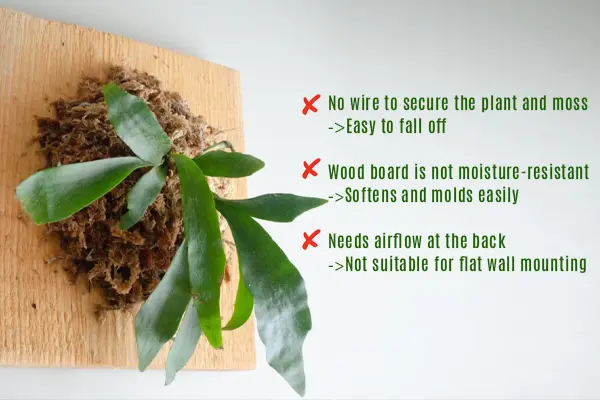
New elkhorn ferns usually arrive potted, and many first-time mounts fail because the root ball stays tight and crowded. The plant looks stable at first, but later it dries unevenly and roots circle instead of spreading into the mount. That can slow new shield growth and reduce long-term vigor.
We unpot a new elkhorn fern, gently break up the soil ball, and do light root work before mounting. We remove old compacted soil, trim only damaged or overly circling roots, and then mount the plant so roots can spread into fresh, airy media. A small amount of root trimming is helpful because it creates space for new roots instead of forcing the plant to live inside an old, tight “plug.”
Video Tutorial About How to Mount A Elkhorn Fern On A Board
Why root prep matters on boards
A board mount relies on roots grabbing the moss and the board surface. If roots remain stuck inside a dense soil ball, water behaves like it does in a pot: the center stays wet longer while the outside dries first. That mismatch is stressful. We see two common outcomes:
- Slow mounting: the plant stays “loose,” and growth stalls because roots do not anchor into the pad.
- Hidden wet core: the old soil stays damp, which can trigger soft tissue issues near the base.
We prefer a clean reset. We remove most of the old potting soil, keep the crown safe, and encourage roots to colonize the new mount fast.
How much root trimming is “safe”
We keep trimming conservative. We remove mushy sections, blackened tips, or long circling roots that are clearly wrapping the pot shape. We avoid aggressive cutting that removes most of the root mass, especially if the plant is already dehydrated from shipping. The goal is not “rootless mounting.” The goal is space and direction so new roots grow outward instead of tangling inward.
Mounting position that protects the growth point
We mount with the crown slightly elevated above the media mound. That prevents water from pooling at the growth point and helps shields form cleanly. If the crown is buried, the mount may stay wet in the worst place, and the plant may rot where recovery is hardest.
If someone wants a fast overview of species basics and why bifurcatum is the beginner-friendly pick, we link readers to what is staghorn ferns before they buy rarer types.
How do we water a mounted bifurcatum easily?Video Tutorial
Many growers overthink mounted watering and then compensate by watering too often. On a board, “a little water often” can keep the center damp and reduce oxygen. Bifurcatum is forgiving, but it also performs best with a slightly drier rhythm, which is why many people call it a “lazy-friendly” staghorn.
We water mounted bifurcatum by removing the board and soaking the root/media pad for a short time, then draining fully. We wait to water again until the mount feels clearly lighter in the hand and the moss feels dry enough to lose most of its weight. This species tolerates short soaking well, but it still needs strong airflow in the pad after watering.
The “weight test” that makes watering easy
We rely on a simple physical signal: board weight.
- When sphagnum dries, it becomes surprisingly light.
- When it is fully hydrated, it carries noticeable weight and feels cool.
We pick up the mount and compare it to the “dry memory” of the same board. That habit becomes accurate fast.
This is also where board material matters. Lightweight boards make the weight test more reliable because the board itself adds very little “background weight.”

1.Acrylic board: stable, clean-looking, and the weight signal mostly comes from the moss and water.
2. Eco plastic board: also very light, easy to handle, and the weight difference is obvious after drying.
When the mount is heavy, we wait. When it becomes light, we soak.
Why bifurcatum likes a slightly drier rhythm
Bifurcatum can handle many environments, but it often grows stronger shields and cleaner fronds when the mount dries between waterings. A constantly damp pad reduces oxygen and encourages soft growth that tears easily. A dry-leaning rhythm supports sturdier tissue and more predictable growth.
Soak method (short soaking is fine)
- Remove the board from the wall.
- Place only the moss/media area into a tub of room-temperature water.
- Soak briefly (often 10–15 minutes is enough for a typical pad).
- Lift and let it drain until dripping slows to occasional drops.
- Rehang only when water is not actively running from the back.
We avoid pouring water directly into the crown because crown rot is the fastest way to lose a mounted staghorn.
Build the mount for airflow, not just moisture
We still use sphagnum moss as the core because it holds water well, but we improve air space by mixing in coarse material. That makes the mount breathe and reduces the risk of “wet center, dry edge.”
We often add a portion of large particles such as:
- chunky perlite
- orchid bark
- coco chunks / coco brick pieces (well-rinsed)
This blend prevents the sphagnum from compacting into a dense mat and helps water drain more evenly after soaking. It also helps new roots explore instead of sitting in a flat, compressed layer.
A quick “do / don’t” watering table
| What we do | Why it works on boards | What we avoid | Why it backfires |
|---|---|---|---|
| Lift the board to judge weight | Weight reflects real moisture in the pad | Watering on a fixed schedule | Homes and seasons change drying speed |
| Short soak + full drain | Even hydration + oxygen returns after draining | Constant misting as the main method | Wet frond bases + poor root hydration |
| Keep the crown dry | Protects the growth point | Water trapped behind shields | Creates hidden rot zones |
If someone is still deciding between pot vs mount and wants to understand the trade-offs in watering behavior, we point them to pot or wall mounted for a side-by-side comparison.
What light and airflow does a mounted bifurcatum need?
Mounted bifurcatum survives in more light situations than most staghorns, but growth quality still depends on the right light and airflow combination. Many “mystery declines” come from a mount that stays wet too long because air cannot move behind it.
We give mounted bifurcatum bright, indirect light and steady airflow, and we create an air gap behind the board when possible. The pad should dry gradually after soaking, not stay soggy for days and not dry in a few hours.
Light cues that tell us if the plant is happy
- Good light: fronds look firm, new shield growth appears regularly, and color stays even.
- Too little light: growth slows, fronds stretch longer and thinner, and shields form weakly.
- Too much direct sun: frond tips scorch or bleach, especially through glass.
We prefer a spot where the plant can cast a soft shadow, and we avoid harsh afternoon sun on the mount face.
The back of the board decides the drying speed
Even with perfect light, a mount can fail if the back stays sealed against the wall. We prefer mounts with:
- spacing hardware that creates a gap behind the board, or
- board designs with airflow channels, or
- a backing style that prevents moisture from being trapped.
Air exchange behind the board helps roots breathe after soaking and prevents sour smells that signal anaerobic conditions.
Why does the moss turn green on the surface, and what should we do?
When light is stronger and the mount stays damp on the surface, the moss layer often turns green. That green layer is common and not instantly dangerous, but it can become a problem when it thickens and reduces airflow. Some growers panic and remount immediately, while others ignore it until the pad stays wet for too long.
We treat green surface moss as a maintenance signal. If the green layer is thin, we can leave it alone. If it becomes thick enough to hold water and block airflow, we remove the top layer and replace it with fresh sphagnum. Mounts with more ventilation holes or better airflow behind them usually handle this issue with less intervention.
- Cause: strong light + consistent surface moisture.
- Effect: algae and moss growth increases on the outer layer.
- Outcome: the pad surface can become denser, so drying slows and oxygen drops, especially near the crown side.
That outcome matters most for beginners because it creates a confusing signal: the surface looks wet (so they wait), but the interior may still be too wet (so the plant stresses anyway).
How we refresh without stressing the plant
We do not tear the whole mount apart unless the interior is also failing. We do a surface refresh:
- Peel or scrape off the green, compact top layer gently.
- Add a thin layer of fresh, long-fiber sphagnum.
- Re-secure the surface so it stays in contact but does not compress hard.
If the mount design has many ventilation holes on the back, it usually stays more stable because air can enter from behind. That feature reduces the urgency of surface cleaning.
When surface green becomes a “must-fix”
We intervene faster when:
- the pad smells sour,
- the mount stays wet too long after soaking,
- shields look soft or dark at the base,
- gnats or other moisture-loving pests show up.
In those cases, airflow and pad structure need improvement, not just cosmetic cleaning.
Practical product picks for beginners (tools, not shortcuts)
We recommend choosing mount hardware that supports the weight-test watering method and improves airflow. Tropical Plant Kit offers three beginner-friendly options:
- Acrylic Mounting Board
Best for clean display setups and easy weight-based watering. The board weight stays consistent, so the “dry vs wet” difference comes mainly from the moss pad. - Eco Plastic Mounting Board
Best for lightweight handling and frequent take-down soaking. The material stays light, so moisture changes are easy to feel by hand. - Wall-Mounted Staghorn Fern Growing Frame (Beginner Favorite)
Best for first-time mounting because it supports airflow, keeps the mount stable, and makes removal for soaking less stressful. A frame also helps prevent the back side from sealing against the wall, which is a common cause of slow drying and rot.
We treat these as practical tools. The real success still comes from light, airflow, and a breathable mount mix.
If readers want to browse the compatible options, we link them to our Wall Planter Collection and encourage them to choose based on their home’s drying speed.
Conclusion
Mounted bifurcatum is a strong first staghorn because it tolerates a wide range of homes and grows roots fast. Tropical Plant Kit focuses on a dry-leaning soak-and-drain rhythm, weight-based watering checks, and breathable mount mixes with coarse particles. With bright indirect light and airflow behind the board, the plant becomes steady, low-maintenance, and easy to display for years.
How to Care and mount a Elkhorn Fern On Wall Mounted Board
Is an elkhorn fern the same as a staghorn fern?
Elkhorn fern and staghorn fern are common names used for Platycerium ferns. Many growers call Platycerium bifurcatum “elkhorn” because the fronds split like elk antlers. Care is similar across Platycerium types, but bifurcatum is usually more forgiving than rarer species.
What is the best board material for mounting an elkhorn fern?
A lightweight, water-resistant board is easiest for beginners because it makes “weight-check watering” simple. Acrylic boards stay stable and look clean. Eco plastic boards are also very light and practical. The key is having an airflow gap behind the board or ventilation holes so the back can dry after watering.
Should I remove soil and trim roots before mounting?
Yes, most potted plants should be unpotted, and the root ball should be loosened so roots can spread into the mount. We remove compacted soil and do light root trimming if roots are circling tightly. This gives the fern space to grow outward instead of staying trapped in an old pot-shaped plug.
What moss should I use, and can I add anything for airflow?
Long-fiber sphagnum moss is the standard because it holds moisture evenly. For better breathability, we often mix in chunky materials like large perlite, orchid bark, or coco chunks so the pad does not compact. This is especially helpful for “drier rhythm” growers and for homes with slower drying.
How do I know when to water a mounted elkhorn fern?
Use the weight test. When the moss pad dries, it becomes much lighter. Pick up the board and compare it to the “wet weight” you remember after watering. Water when the board feels noticeably lighter and the pad feels only slightly damp near the center, not cold and soggy.
Is it okay to dip the mount in water for a few seconds?
Yes. A quick dip (about 10–15 seconds) can work well for bifurcatum when the moss pad is not overly thick. It rehydrates the outer pad without keeping the mount wet for too long. After dipping, let it drip briefly and rehang with good airflow.